Part 3: Reversing & Exploiting Custom Windows Named Pipe Servers
Date
Authors
Robert Hawes
Follow Us
VerSprite Walks Through How to Reverse A Compiled Binary That Has A Custom Named Pipe Server
In the third part of this four-part series, VerSprite’s VerSprite’ security researchers dive deeper into reversing and exploiting custom Windows named pipe servers using a custom vulnerable application. The first article covered the fundamentals of Windows Named Pipes and part two covered how to analyze a vulnerable Microsoft Windows named pipe application. This article is divided into two main topics—reviewing background information and static analysis.
This first half of this blog contains background information essential to understanding the second half of the blog. For more information on general background material, please review the previous two pieces that go into much greater detail.
The second half of the blog builds upon the necessary background information by first presenting the introduction of source code. Next, when revisiting these same topics, no source is available, so instead, VerSprite’s security researchers will reverse a compiled binary that has a custom named pipe server implemented within.
Inside This Article on Windows Named Pipe Servers:
Reviewing named pipe creation
Creating custom permissions for named pipe objects
Discovering how to create a client application to communicate with the named pipe server
Identifying named pipe Application Programming Interfaces (API) being utilized within an application
Performing call flow analysis on the function call to CreateNamedPipeW()
Reviewing Windows Named Pipe API Functions
When reversing applications or binaries, one of the first steps VerSprite’s security researchers perform is to identify widely used functions related to specific functionality that is exposed by the Windows API. These APIs are thoroughly documented within the official Windows Dev Center and have a variety of useful information for cybersecurity researchers.
VerSprite’s researchers use the Windows Dev Center to review the public documentation surrounding Windows named pipes. The Windows Dev Center shows background documentation on usage and examples, as well as dedicated functions exposed via multiple APIs. The exact functions that are directly related to named pipe functionality are outlined in the table below:
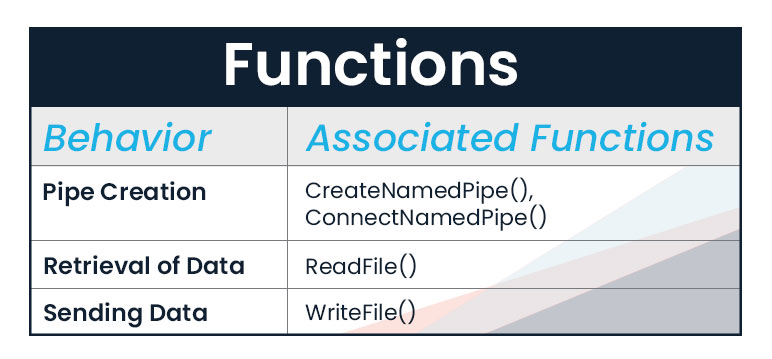
Table 1 – Windows Named Pipe Functions: Pipe Creation, Data Retrieval, and Sending Data
An example of how to create a Windows named pipe and subsequentially retrieving data appears in the C++ code below:
Example 1: Using C++ to Create Named Pipe Object Permissions (Windows)
// zero out the memory of our explicit access structure
ZeroMemory(&ea, 2 * sizeof(EXPLICIT_ACCESS));

// Create a well-known SID for the Everyone group.
// The last argument "pEveryoneSID" is a pointer to the allocated and initialized SID structure that is
// returned from the "AllocateAndInitializeSid()" function
// Important Links:
//	https://docs.microsoft.com/en-us/windows/win32/secauthz/well-known-sids
//	https://docs.microsoft.com/en-us/windows/win32/api/securitybaseapi/nf-securitybaseapi-allocateandinitializesid
//	https://docs.microsoft.com/en-us/windows/win32/api/securitybaseapi/nf-securitybaseapi-freesid
AllocAndInitSidEveryone = AllocateAndInitializeSid(&SIDAuthWorld, 1, SECURITY_WORLD_RID, 0, 0, 0, 0, 0, 0, 0, &pEveryoneSID);
// Check if the return value is not true (FALSE a.k.a. Failure)
// If the function did not succeed then we must call the "FreeSid()" function that is implemented within the "Cleanup" routine
if (!AllocAndInitSidEveryone) {
std::cout << "t[+] Server: Error creating SID for the "Everyone" Group." << std::endl;
std::cout << "tt[!] Server: "GetLastError()" -> " << GetLastError() << std::endl;
goto Cleanup;
}
// The ACE will allow Everyone full access to the key.
// Populate ACE number 1 in relation to "EVERYONE" group
ea[0].grfAccessPermissions = GENERIC_ALL;
ea[0].grfAccessMode = SET_ACCESS;
ea[0].grfInheritance = NO_INHERITANCE;
ea[0].Trustee.TrusteeForm = TRUSTEE_IS_SID;
ea[0].Trustee.TrusteeType = TRUSTEE_IS_WELL_KNOWN_GROUP;
ea[0].Trustee.ptstrName = (LPTSTR)pEveryoneSID;

// Create a well-known SID for the BUILTINAdministrators group.
// The last argument "pAdminSID" is a pointer to the allocated and initialized SID structure that is
// returned from the "AllocateAndInitializeSid()" function
// Important Links:
//	https://docs.microsoft.com/en-us/windows/win32/secauthz/well-known-sids
//	https://docs.microsoft.com/en-us/windows/win32/api/securitybaseapi/nf-securitybaseapi-allocateandinitializesid
//	https://docs.microsoft.com/en-us/windows/win32/api/securitybaseapi/nf-securitybaseapi-freesid
AllocAndInitSidAdmin = AllocateAndInitializeSid(&SIDAuthNT, 2, SECURITY_BUILTIN_DOMAIN_RID, DOMAIN_ALIAS_RID_ADMINS, 0, 0, 0, 0, 0, 0, &pAdminSID);
// Check if the return value is not true (FALSE a.k.a. Failure)
// If the function did not succeed then we must call the "FreeSid()" function that is implemented within the "Cleanup" routine
if (!AllocAndInitSidAdmin) {
std::cout << "t[+] Server: Error creating SID for the "BUILTIN\Administrators" Group." << std::endl;
std::cout << "tt[!] Server: "GetLastError()" -> " << GetLastError() << std::endl;
goto Cleanup;
}

// The ACE will allow the Administrators group full access to
// Populate ACE number 2 in relation to "BUILTINAdministrators" group
ea[1].grfAccessPermissions = GENERIC_ALL;
ea[1].grfAccessMode = SET_ACCESS;
ea[1].grfInheritance = NO_INHERITANCE;
ea[1].Trustee.TrusteeForm = TRUSTEE_IS_SID;
ea[1].Trustee.TrusteeType = TRUSTEE_IS_GROUP;
ea[1].Trustee.ptstrName = (LPTSTR)pAdminSID;

// Create a new ACL that contains the new ACEs.
// https://docs.microsoft.com/en-us/windows/win32/api/aclapi/nf-aclapi-setentriesinacla
dwRes = SetEntriesInAcl(2, ea, NULL, &pACL);
// Check to make sure that the "SetEntriesInAcl()" function executed successfully
if (dwRes != ERROR_SUCCESS) {
std::cout << "t[+] Server: "SetEntriesInAcl()" failed." << std::endl;
std::cout << "tt[!] Server: Error -> " << dwRes << std::endl;
goto Cleanup;
}

// Allocate memory for a "PSECURITY_DESCRIPTOR" object
// By using LPTR we're returning a PTR to the "PSECURITY_DESCRIPTOR" object and "zeroing" the contents of that object!
// https://docs.microsoft.com/en-us/windows/win32/api/winbase/nf-winbase-localalloc
pSD = (PSECURITY_DESCRIPTOR)LocalAlloc(uFlags, SECURITY_DESCRIPTOR_MIN_LENGTH);
// Check and make sure that LocalAlloc() did not fail.
// Failure == NULL | Success == HANDLE of new Memory Object (In our case this is a PSECURITY_DESCRPITOR POINTER)
if (pSD == NULL) {
std::cout << "t[+] Server: Failed to allocate "PSECURITY_DESCRIPTOR" object!" << std::endl;
std::cout << "tt[!] Server: Error -> " << GetLastError() << std::endl;
goto Cleanup;
}

//Initialize our "PSECURITY_DESCRIPTOR" from "pSD" (LocalAlloc) function call.
// https://docs.microsoft.com/en-us/windows/win32/api/securitybaseapi/nf-securitybaseapi-initializesecuritydescriptor
InitSecDescp = InitializeSecurityDescriptor(pSD, SECURITY_DESCRIPTOR_REVISION);
if (InitSecDescp == FALSE) {
std::cout << "t[+] Server: Failed to initialize security descriptor!" << std::endl;
std::cout << "tt[!] Server: Error -> " << GetLastError() << std::endl;
std::cout << "t[+] Server: Exiting now." << std::endl;
goto Cleanup;
}

// Now that we have successfully created the "SECURITY_DESCRIPTOR" a.k.a. "pSD" structure and initialized it
// This step is to now assign the custom "DACL" specified by the "pACL" (ACL) structure created earlier to our new "pSD" structure
// https://docs.microsoft.com/en-us/windows/win32/api/securitybaseapi/nf-securitybaseapi-setsecuritydescriptordacl
if (!SetSecurityDescriptorDacl(pSD, daclPresent, pACL, defaultDacl)) {
std::cout << "t[+] Server: Failed to initialize security descriptor!" << std::endl;
std::cout << "tt[!] Server: Error -> " << GetLastError() << std::endl;
std::cout << "t[+] Server: Exiting now." << std::endl;
goto Cleanup;
}

// Initialize a security attributes structure.
sa.nLength = sizeof(SECURITY_ATTRIBUTES);
sa.lpSecurityDescriptor = pSD;
sa.bInheritHandle = FALSE;

// Entering Named Pipe Creation
// We have two main potential cases here and they are either "Normal" execution or "Debug Mode" execution:
//	If "Normal" mode is detected then code executes.
//	If "Debug Mode" is detected then another branch is taken and code execution diverts down the "Debug Mode" path.
std::cout << "n[+] Server: Creating Named Pipe Server now!" << std::endl;
std::wcout << "t[!] Name: NinjaReallyn" << std::endl;
hPipe = CreateNamedPipe(TEXT("\\.\pipe\NinjaReally"),
PIPE_ACCESS_DUPLEX | FILE_FLAG_FIRST_PIPE_INSTANCE,
PIPE_TYPE_BYTE | PIPE_READMODE_BYTE | PIPE_WAIT | PIPE_REJECT_REMOTE_CLIENTS,
1,
1024 * 16,
1024 * 16,
NMPWAIT_USE_DEFAULT_WAIT,
&sa);
How to Communicate Between a Client and Server
Being able to communicate with named pipe servers is a crucial step when trying to perform security research. Luckily, Microsoft has made it easy to establish communication between a client and the server when handling named pipes.
Programmers can use either the CreateFile() or CallNamedPipe() functions to gain a handle to a specific named pipe. Then, after establishing a valid handle to a named pipe that contains permissions to allow that particular user or group the ability to write, the usage of the WriteFile() function can be made. The C++ code in Example 2 demonstrates this programmatic flow.
Example 2: Client Obtaining Handle to Named Pipe And  Attempting a WriteFile() Call
uint8_t sendPkt(ChallengePacketFormat* spClientPktFormat) {
// These variables are used for creation of a "HANDLE" to a named pipe object and also for attempting to "WRITE" data to the pipe using "WriteFile()"
HANDLE spHandlePipe = INVALID_HANDLE_VALUE;
DWORD spBytesWritten = 0;
BOOL spWriteFileResponse = FALSE;

std::cout << "t[!] Client: Establishing handle to named pipe!" << std::endl;
spHandlePipe = CreateFile(TEXT("\\.\pipe\NinjaReally"),
GENERIC_READ | GENERIC_WRITE,
0,
NULL,
OPEN_EXISTING,
FILE_ATTRIBUTE_NORMAL,
NULL);
std::cout << "t[!] Client: Checking if handle is valid or not!" << std::endl;
if (spHandlePipe != INVALID_HANDLE_VALUE) {
std::cout << "tt[!] Client: Handle was successfully gained!" << std::endl;
std::cout << "[+] Client: Attempting to send data to the named pipe server!" << std::endl;
spWriteFileResponse = WriteFile(spHandlePipe,
&spClientPktFormat->cpfData[0],
(DWORD)spClientPktFormat->cpfData.size(),  // = length of byte array
&spBytesWritten,
NULL);
Static Analysis: Identifying Windows Named Pipe API Usage
When approaching compiled binaries with no accompanying source code, VerSprite’s security researchers begin a given assessment by building the potential attack surface for the target. The attack surface can vary depending on the possible functionality that a given target implements within its application.
To build upon the attack surface even further, Microsoft supports a robust userland API that houses exposed functions for specific purposes. Knowing Microsoft utilizes highly descriptive APIs allows security researchers to build an attack surface for a given application just by reviewing its imported functions.
In this scenario, functionality relating to Windows named pipe usage is present. This information can be verified by using a disassembler such as IDA-Pro from Hex-Rays. IDA-Pro is both a disassembler and potentially a decompiler depending on whether one has access to the extended functionality that Hex-Rays offers.
To verify a named pipe is being used in relation to the function, navigate to the Imports windowpane within IDA-Pro’s Graphical User Interface (GUI) after loading the targeted VS-Labs_NPS.exe binary into IDA-Pro for processing.
Upon arriving at the Imports window, select any function name within any provided text row. Next, press the hotkey shortcut CTRL + F to trigger the ability to search for a specific function name and proceed to enter the function CreateNamedPipe. Upon completing the previous steps successfully, the Imports window will appear like the image below, depicting a successful identification of CreateNamedPipe.
Figure 1 – How to CreateNamedPipe Identification
The image above shows that the VS-Labs_NPS.exe binary imports the CreateNamedPipeW() function from the KERNEL32 Dynamic Linked Library (DLL). The next step after identifying the presence of the CreateNamedPipeW() function is to find actual usage of this function within the binary.
To quickly identify whether the CreateNamedPipeW() function is being used, double click on the function name within the Imports window. IDA-Pro’s GUI will now show that the IDA-View A windowpane is in the forefront and the function CreateNamedPipeW() is still highlighted in yellow. This behavior is depicted in Figure 2.
Figure 2 – Function Import Table – CreateNamedPipeW()
The most important behavior that occurs in Figure 2 is:
- The
CreateNamedPipeW()function returns aHANDLEobject. - The function is called using the
__stdcallcalling convention. - The function’s input arguments are also recorded along with their specific datatypes.
This information can be cross-referenced on Microsoft Dev Center to review its official documentation for the CreateNamedPipeW() function.
Cross-reference the use of this function within the entire VS-Labs_NPS.exe binary by pressing the hotkey x while simultaneously highlighting the desired function CreateNamedPipeW(). This action will cause a new window to appear in IDA-Pro’s GUI that is called the xrefs popup window. Figure 3 is an example of the xrefs popup window.

Figure 3 – CreateNamedPipeW IDA-Pro Xrefs Popup
The Xrefs popup window provides a few columns that provide valuable information to inspect.
The column names within the xrefs window are as follows:
- Direction – The
Directioncolumn provides insight into what direction the reference is located; potential values are eitherupordown. Theupvalue signifies a reference that is at a smaller address and thedownvalue signifies a reference that is a larger address. - Type – The
Typecolumn can hold a multitude of values; however, in this exact instance, only two values are present, and these arepandr. Thepvalue declares the reference to the functionCreateNamedPipeW()is a near (intrasegment) call. Thervalue declares the reference to the functionCreateNamedPipeW()is being operated on during areadoperation. - Address – The
Addresscolumn provides either thenice namesor the raw address to the reference location. Thenice namesoption implies that the reference will be in the format offunction_name+offset. In this case, forCreateNamedPipeW(), thenice namesformat isAAA_namedPipe_startup+389and the raw address is0x140003D49. - Text – The
Textcolumn in this specific case provides the immediate instructions where theCreateNamedPipeW()function is being utilized. For both of the recorded references, both instructions are callcs:CreateNamedPipeW.
Further information can be obtained from the official documentation of Hex-Rays.
Selecting either of the two references in the xrefs window will cause IDA-Pro’s GUI to open the IDA View-A windowpane. The exact Address from the Address column within the xrefs popup will now become present. An example of this behavior can be seen in Figure 4 below.
Figure 4 – CreateNamedPipeW Xref’s Location
After reviewing the information within the image above, it is apparent that navigation has led to a CreateNamedPipeW() function call. Now that this is identified, the next step is to perform control flow analysis (also called call flow analysis) to get an understanding of what circumstances led to this function being called.
Windows Named Pipes: Control Flow Analysis
After identifying the presence of functions relating to Windows named pipe behavior within an application, the next step is to perform control flow analysis, more commonly referred to as call flow analysis. Call flow analysis, in its purest form, can be described as performing analysis to identify the proper sequence of function calls that leads to the targeted function call and/or piece of code. It is important to note that unlike standard call flow analysis, what we are doing in this scenario is an extremely light touch on the topic. Our goal is to provide an immediate general understanding of the concept.
There are two available discovery methods related to call flow analysis. The first is via using the cross-reference hotkey, as described earlier. In contrast, the second method uses the WinGraph32 – xref to option to generate an image showing a generic call flow graph. To generate the second method’s output, navigate to the function name, highlight the name, then right-click and navigate to the option called Xrefs graph to. Figure 5 shows an example of how to select this option.
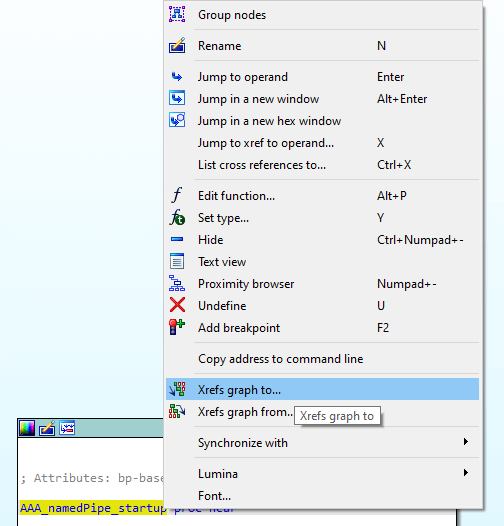
Figure 5 – How to use the Xrefs graph to method
After selecting this option, a new window and a generic call flow graph will appear as shown in Figure 6.
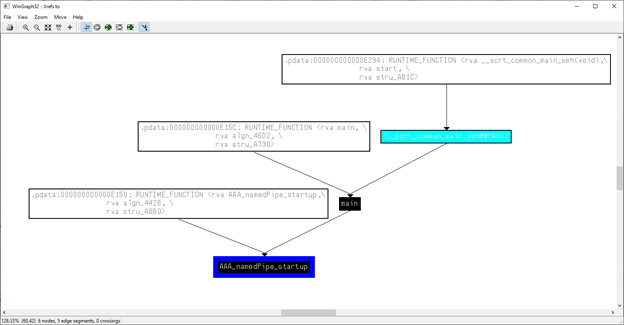
Figure 6 – WinGraph32 – Xrefs to option
Figure 6 shows only two important functions. These are the main() and the AAA_namedPipe_startup() functions. A direct call to the CreateNamedPipeW() function exists within the main() function itself.
This same information can also be obtained by directly utilizing the Xrefs hotkey x. This method is not as straight forward as the WinGraph32 – Xrefs [to/from] option; however, it can still be quite useful depending on the scenario.
To do this, navigate back to the address offset 0x3d49, where the direct call to CreateNamedPipeW() is present. Then, navigate to the function name and highlight before pressing the hotkey x to trigger a cross-reference.
Once those steps are done, a window like the one below will appear:
Figure 7 – Xref Call Flow Analysis for Windows Named Pipes
The call flow is quite small in both examples; however, this behavior is not the same when presented with more complex binary applications. This behavior of smaller call flow charts is not the case in most applications. In cases where applications are larger or more extensive, call flow analysis can become quite intricate.
Going back to our scenario, now that the call flow analysis is complete the next step is to identify how the specific code block at address offset 0x3CAD is executed.
Static Analysis for Windows Named Pipe Servers: Understanding the path to 0x3CAD
After identifying the presence of named pipe API usage within an application, the next common step is to perform analysis to understand how that specific piece of code is reached and executed. This analysis is a significant part of the research and performed using only static, or a mix between both static and dynamic analysis. Dynamic analysis is performed during runtime of a given binary. This type of analysis is commonly used along with software or scripts to extract information about the binary during runtime for analysis. However, for this scenario, only static analysis is being used.
The first step to perform static analysis on a CreateNamedPipeW() is to look at the graph view of the AAA_namedPipe_startup() function. This will help you understand the overall potential code flow and give insight into the type of checks that will be encountered.
To switch between both text view and graph view, have the cursor selected within either graph or text view and press the spacebar key. This key will automatically transfer the view from the text view to the graph view or vice versa.
Here is an example graph view of this function:
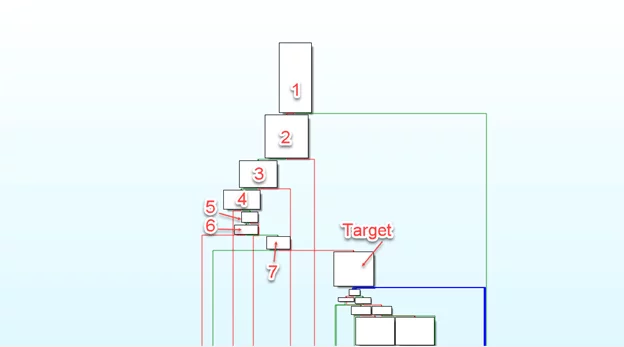
Figure 8 – AAA_namedPipe_startup() Function – Graph View
After reviewing Figure 8, you will notice seven checks must be reviewed to understand how the code within the Target code block is reached and executed successfully.
Starting with check number one within the main code block of the AAA_namedPipe_startup() function, a single check is made on the return value from an operator new() function call. If the operator new() function does not return a valid pointer and instead returns null, an error is detected, code is diverted to an error branch, and the function exits. This behavior is shown in Figure 9.
Figure 9 – Static Analysis of Windows Named Pipes Check One – How the code within the Target Code Block is Reached and Executed
Upon a successful pointer being returned from the operator new() function, the next code executed is at address offset 0x3A3B. This code block performs two memory initialization routines via calls to the memset() function. The first initialization is for exactly 5000, which correlates to the myVector array, which is initialized with 5000 uint8_t elements. The second initialization is for the local variable called Buffer, which is later used to read incoming messages from potential clients. This buffer is allocated with 1032 uint8_t bytes.
After both of these calls to memset() you will make a call to AllocateAndInitializeSid() function at address offset 0x3AC8. The AllocateAndInitializeSid() function is responsible for creating and initializing a security identifier and, in this case, for the Everyone group. If this function fails, the return value is null; if the value succeeds, then the return value is non-null. With this information, immediately after this function call, a check is made to see if the return value is non-null. If the check is not true, then code execution leads to error messages and a cleanup routine that ultimately leads to the program exit. However, if the check is true, then code execution continues to the next code block. This behavior is shown in Figure 10.
Figure 10 – Check Two – Static Analysis of Windows Named Pipes
With a successful call to AllocateAndInitializeSid(), the next code to execute is at address offset 0x3B73. This code block, similar to the previous code block, is only a call to the AllocateAndInitializeSid() function. However, unlike the last code block, this function call is for initializing a security identifier for the Built-inAdministrators group. A check is performed to make sure that the return value is not null. If the return value is null, then code execution will divert to the display of an error message followed by a program exit. However, code execution will continue to the next code block if the return value is not null. This behavior is shown in Figure 11.
Figure 11 – Static Analysis of Windows Named Pipes Check Three
Upon valid initialization of the Built-inAdministrators group security identifier, the next code is executed at address offset 0x3B73. This code block is responsible for creating a new Access Control List (ACL). The ACL is created utilizing two Access Control Entries (ACE) within an Explicit Entries array where each Security Identifier for both Everyone and Built-inAdministrators is available. The first ACE is created within the code block, as seen in Figure 11, while the second ACE is created in the following code block starting at address offset 0x3B73.
The method of how this new ACL is created is via a call to SetEntriesInAclW() function. This function returns either ERROR_SUCCESS value, or a nonzero error code if the function fails. A check is present after this call and is made to check that the return value is null; however, if the return value is not null, then code execution is diverted, and a cleanup routine is executed until ultimately, the program exits. This behavior is shown in Figure 12.
Figure 12 – Creating an Access Control List (ACL) for Windows Named Pipes
After successfully creating a new ACL, the next step is to perform the allocation of a PSECURITY_DESCRIPTOR object via a call to the LocalAlloc() function. This function will return a zeroed pointer to a buffer with a length of 0x28 bytes. After the call to LocalAlloc(), a check is made to ensure the return value is not null. If the return value is null, then code execution diverts to a cleanup routine, and ultimately, it exits. However, code continues to the next code block if the return value is a valid pointer. This behavior is shown in Figure 13.
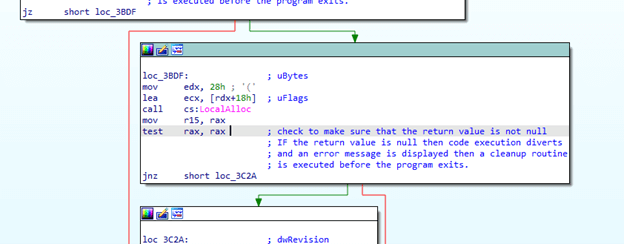
Figure 13 – Check 5 – Perform Allocation of A PSECURITY_DESCRIPTOR Object Via A Call to the ocalAlloc() Function
With a valid pointer to a PSECURITY_OBJECT created, the next code executed is at address offset 0x3C2A. Once again, this is a smaller code block like the previous code block. Within this code block, a single call to the InitializeSecurityDescriptor() function is made. This function is responsible for initializing a new security descriptor object utilizing the pointer returned from the previous call to the LocalAlloc() function. After this call, a check exists to make sure that the return value does not equal zero. This behavior is shown in Figure 14.
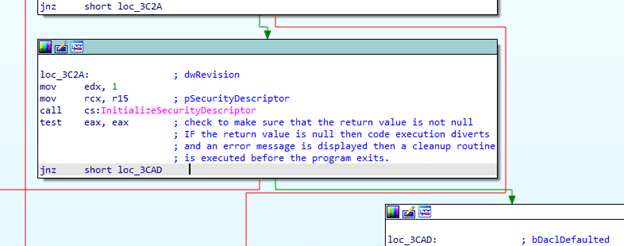
Figure 14 – Check Six – Address offset 0x3C2A
After a successful security description initialization, the next code executed is at address offset 0x3CAD. This code block is another single call block, where the SetSecurityDescriptorDacl() function is called. This function is responsible for populating information with a given Discretionary Access Control List (DACL), or if the information is already present, then the DACL is replaced. After this function call, a check is made to see if the return value is null. If the return value is not null, then the function call succeeded, and code execution continues down the correct path to the next code block. This behavior is present in Figure 15.
Figure 15 – Windows Named Pipe Static Analysis Check Seven – Discretionary Access Control List (DACL)
The majority of the code covered thus far from the start of the AAA_namedPipe_statup() function is all in relation to creating the Security Attributes object that is passed as an argument to the CreateNamedPipeW() function.
The purpose of covering this initial analysis is that by being able to identify the presence of a named pipe server and its associated permissions, overall analysis can be performed at a more effective rate.
Now that we have obtained our initial understanding of how Windows named pipe servers are created, the next blog will cover the following information:
- Static Analysis Reversing Named Pipes and Custom Functionality
- Reversing custom functionality exposed by the named pipe server
- Reversing the named pipe server custom protocol
- Windows Named Pipe Exploitation
- Walking through a single abuse case targeting given functionality within the named pipe server
VerSprite Security Research Team
Maintain awareness regarding unknown threats to your products, technologies, and enterprise networks. Organizations that are willing to take the next step in proactively securing their flagship product or environment can leverage our zero-day vulnerability research offering. Our subscription-based capability provides your organization with immediate access to zero-day vulnerabilities affecting products and software. Learn More →