Part II: Analysis of a Vulnerable Microsoft Windows Named Pipe Application

Date
Authors
Robert Hawes
Follow Us
Introduction Part II: Identifying Used of Named Pipe Servers
In part II of this three-part series, we dive deeper into hands on examples of identifying usage of named pipe servers within applications using a custom vulnerable application. The methods covered to achieve this goal is through usage of both dynamic and static analysis.
How to Analyze Named Pipes Using Dynamic and Static Analysis Techniques
Before starting the analysis of the vulnerable named pipe application, it is important to become familiar with how to analyze named pipes using dynamic and static analysis techniques.
The following sections will discuss the differences between these two techniques and how different tools can be utilized to accurately gain information about named pipe behavior in an application.
For more information about dynamic versus static analysis, refer to this section Dynamic vs. Static Analysis in our blog post: Windows Userland Attack Surface Enumeration.
Dynamic Analysis
Dynamic analysis is beneficial for a quick and somewhat accurate initial analysis of what a process or application is doing during runtime. Several tools are available for performing dynamic analysis on named pipes, some of which can be seen in the list below:
SysInternals Suite of Tools
Process MonitorProcess ExplorerAccesschkPipeList
A common tool that is utilized by VS-Labs during initial analysis is Process Explorer from the SysInternals Suite.
Process Explorer is a versatile tool that provides great insight into the current runtime activities of a process and or application.
Upon initially starting Process Explorer, a graphical user interface (GUI) is shown, as can be seen below in Figure 3:
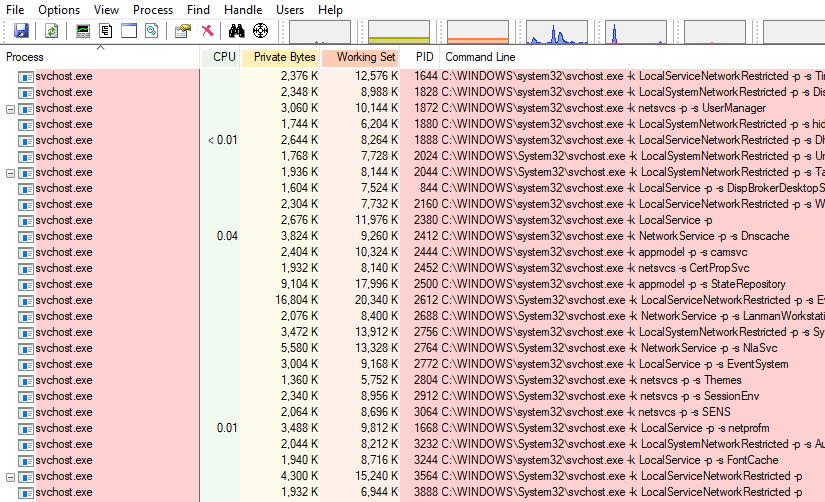
Figure 3 – Process Explorer’s main window
Next, the option to view open handles that a process or application has created is enabled by navigating to View followed by Lower Pane view and then Handles. This sequence of events can be seen in Figure 4 shown below.
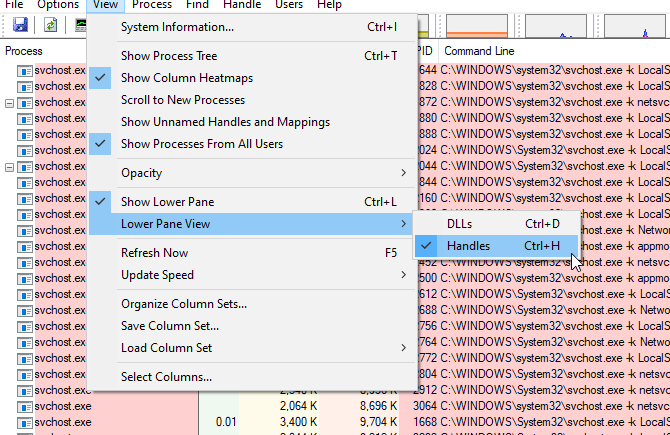
Figure 4 – Enabling handles view in Process Explorer
After enabling the Handles option, navigate to the new window that has been opened and look for the object type called File.
Note that not every File object is considered a named pipe; some of these objects are handles to real files on the system. Therefore, it is advisable to review the output from Process Explorer carefully.
An example of the type of information that is presented from Process Explorer can be seen in Figure 5 below, which demonstrates how users can quickly and efficiently identify processes that are utilizing named pipes.
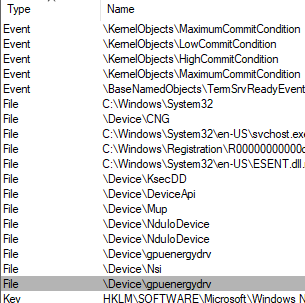
Figure 5 – Viewing File object handles in Process Explorer
Another tool commonly used for dynamic analysis of named pipes is Accesschk. This tool is also a part of the SysInternals Suite and it allows the effective enumeration of every active named pipe on the system along with the permissions associated with these pipes.
To gather this information, pass the string pipe to Accesschk via the command-line interface. An example of the output from running this tool can be seen in Figure 6 below.
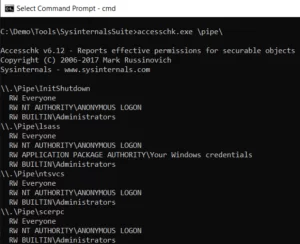
Figure 6 – Accesschk permissions
Reviewing the output reveals information about the permissions assigned to various named pipes.
Note that some results may hold the value of Error getting security: All pipe instances are busy. This response indicates that the maximum allowed number of instances for these specific pipes has been reached.
All other named pipes that have not reached the maximum allocated instances have their respective permissions displayed as can be seen with the InitShutdown named pipe.
Static Analysis
Static analysis allows researchers to analyze a program without running it. Some examples of tools that can perform static analysis are IDA Pro from Hex-Rays, and Ghidra from the NSA. This post will utilize IDA Pro as it is the most mature platform for static analysis on Windows.
When performing static analysis to identify if a program is utilizing named pipes it is useful to examine several functions. These functions fall under three categories: creation, retrieving data, and writing data.
These categories can be seen in the tables below:
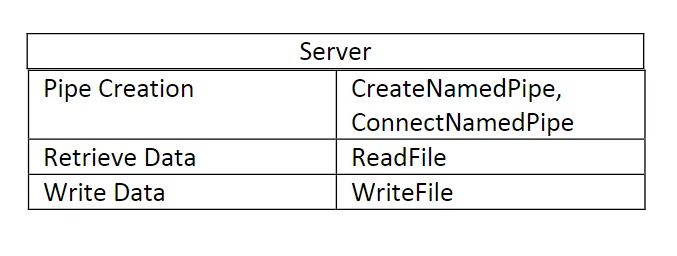
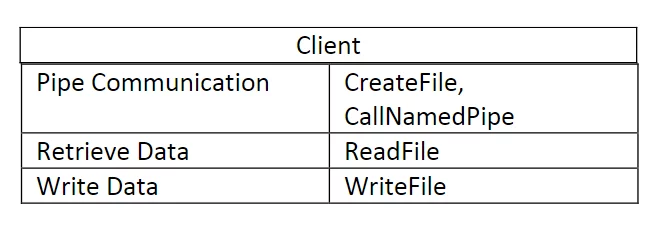
One important thing to note about the tables above is that both client and server related code use the same functions for retrieving data from and writing data to named pipes.
This occurs because named pipes are treated as files, so Windows API functions such as ReadFile() and WriteFile() can operate on named pipes as they would a normal file.
Although reading and writing to a pipe involves similar calls for both client and server code, pipe creation is a different matter. For server code, there is CreateNamedPipe(), which will create a named pipe, and ConnectNamedPipe(), which is used to start communication over a named pipe.
For client code, there is CreateFile(), which is used to connect to a pipe and start communications, and CallNamedPipe(), which connects to a named pipe, conducts a read or write operation, and then closes the pipe.
An example of how CreateNamedPipe() is utilized can be seen in the image below (note that the Unicode variant of CreateNamedPipe() is being called here, hence why the function name is CreateNamedPipeW().
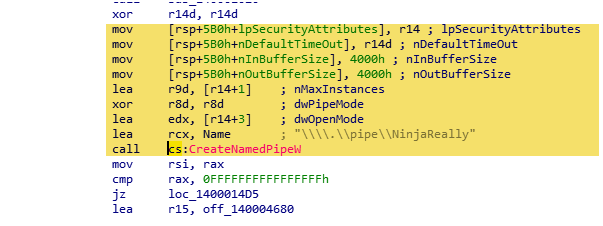
Figure 7 – IDA Pro – CreateNamedPipeW() function call
Now that the basics of named pipes have been covered, it is now time to analyze VS-Labs vulnerable named pipe server.
Vulnerable Named Pipe Server Overview
This vulnerable named pipe server currently implements four logic-based vulnerabilities.
This section will discuss how to identify the utilization of named pipes within this server, as well as how to read and write data to the named pipe that the program creates.
Interested readers can follow along by downloading the vulnerable named pipe server code from this GitHub link.
It is recommended to review the README file to ensure proper deployment of the vulnerable named pipe server.With the server set up, the next step is to perform initial reconnaissance to gather information about the application.
Vulnerable Named Pipe Server – Dynamic Analysis
To start off the analysis, Procexp64.exe from SysInternals Suite will be utilized. After running Procexp64.exe as an Administrator, enable the Handles view option.
Next, search inside of the main window that lists all the active processes, select and highlight the name NamedPipe_Examples.exe.
If everything is set up correctly, then the target executable should be highlighted and the handles view should be visible.
This should look something like the following screenshot:
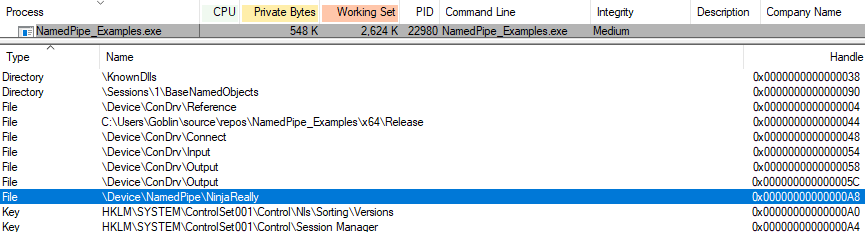
Figure 8 – Procexp64.exe – NamedPipe_Examples.exe handles view
By reviewing Figure 8 shown above, it is possible to observe the presence of a potential named pipe called NinjaReally. To discover what users and/or groups have access to read or write data to this pipe, utilize accesschk.exe.
The complete named pipe name, PipeNinjaReally, is passed in as the argument to accesschk.exe to specify the specific pipe to enumerate (note that if Pipe was used instead, then every single active named pipe would be enumerated).
The output from this command can be seen below.
CMD> accesschk.exe PipeNinjaReally
Accesschk v6.12 - Reports effective permissions for securable objects
Copyright (C) 2006-2017 Mark Russinovich
Sysinternals - www.sysinternals.com

\.PipeNinjaReally
RW NT AUTHORITYSYSTEM
RW BUILTINAdministrators
RW DESKTOP-XXXXXXTEST
R  Everyone
R  NT AUTHORITYANONYMOUS LOGON
Reviewing the output reveals that that the user TEST can (R)ead and (W)rite to this named pipe.
The other groups such as Everyone can only (R)ead from the named pipe.
Vulnerable Named Pipe Server – Static Analysis
Now that the named pipe NinjaReally has been identified within NamedPipe_Examples.exe using dynamic analysis, let’s examine how the same steps can be performed with static analysis using IDA Pro.
Once NamedPipe_Examples.exe is loaded into IDA Pro, the first task is locating the function responsible for creating a named pipe.
This function is called CreateNamedPipeW() and can be located by navigating to the Import window of IDA Pro, which shows the functions that a program imports from other modules and DLLs. Figure 9 below shows IDA Pro's Import window after a filter on CreateNamedPipe was applied.
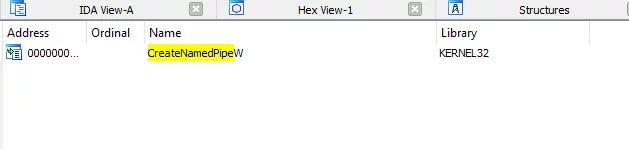
Figure 9 – IDA Pro – NamedPipe_Examples.exe – Import Table Window
In order to reference where CreateNamedPipeW() is being used within NamedPipe_Examples.exe, one can use IDA Pro's cross-referencing feature to view all instances in the code where CreateNamedPipeW() is called.
To utilize this feature, double click with the left mouse button on the CreateNamedPipeW() function inside of the Import window.
The view should change to the IDA View-A window, and the function name should be visible.
Next, double click (highlight) the function name and hit the X key whilst the function name is highlighted. A new dialog box should be displayed, showing all the cross-references to the CreateNamedPipeW() function; it should look similar to Figure 10 shown below.
Please note that offset inside of the Address column is subject to change depending on the version of NamedPipe_Examples.exe that is being disassembled.
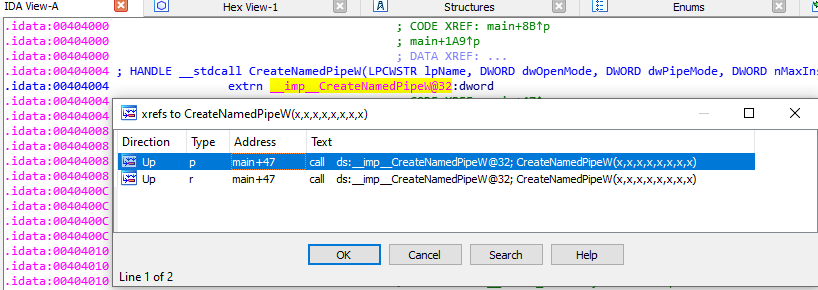
Figure 10 – IDA Pro – NamedPipe_Examples.exe – IDA View-A function name
Next, navigate to an entry in the xrefs popup window and double click it. After double-clicking an entry, IDA Pro will open up a disassembly view of the exact location in NamedPipe_Examples.exe where the selected call was made. This behavior can be seen in Figure 11 shown below.
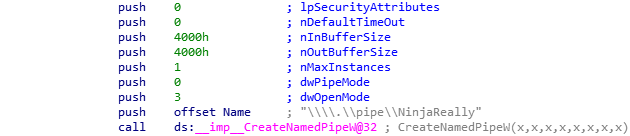
Figure 11 – IDA Pro – NamedPipe_Examples.exe – Found usage of CreateNamedPipe()
The disassembly reveals that the named pipe NinjaReally, which was found earlier with ProcExp64.exe, is indeed being created within NamedPipe_Examples.exe via a call to CreateNamedPipeW().
Now that the code responsible for creating the named pipe server has been identified, the final step is a sanity check to make sure that the TEST user can write data to the NinjaReally named pipe server.
Vulnerable Named Pipe Server – Named Pipe Client Creation
To check that the TEST user can write data to the NinjaReally named pipe, it is necessary to create a named pipe client. This can be accomplished using a multitude of languages; for the purposes of this post C++ will be utilized.
Using the knowledge that named pipes are treated as file objects, it is possible to write up appropriate code by utilizing the functions CreateFile(), WriteFile(), ReadFile(), and CloseHandle().
The code will first call CreateFile() with the string \\.\pipe\NinjaReally as the first argument to establish a handle to the named pipe server. A handle is an integer value data type declared and referenced as HANDLE within the Windows API, and it is used to reference a specific instance of an object within the windows operating system.
After obtaining the handle, the next step is to send data to the named pipe server. To do this the named pipe is treated as a file and the WriteFile() function is used to write the desired data to the named pipe.
As the server may respond to data sent to its named pipe, the code also calls ReadFile() on the named pipe to read responses sent by the server into a local buffer in the client code.
When all operations are complete, a call to CloseHandle() is made to destroy the active HANDLE that was being used to interact with the named pipe. Figure 12 shown below illustrates how all these operations work and how they interact with one another.
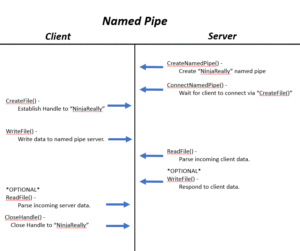
Figure 12 – Communication cycle from client -> server
Note that in the diagram displayed above the server’s response, and the client’s parsing of the server’s response, are marked with the *OPTIONAL* tag, as these steps are not performed with Half-duplex named pipes.
Additionally, it is important to note that this outline is only an overview of the communication cycle based off what VS-Labs researchers have observed in real world applications. It is possible that an application could deviate from this behavior in some manner, so it is advisable to take care when researching targets.
Vulnerable Named Pipe Server – Verifying Write Permissions
Now that a proper understanding of how a client communicates to a named pipe server has been acquired, one final approach that can be used to perform reconnaissance is to use the tool IO Ninja from Tibbo Technology Inc.
IO Ninja is capable of monitoring data sent between named pipe servers and clients accurately. Using IO Ninja, it is possible to record the communication between the client and the server, which will consist of the following operations:
- Server: Named pipe creation
- Client: Obtain HANDLE to named pipe
- Client: Send message to server
- Server: Receive message
By using IO Ninja to record the events listed above one can gain a visual understanding of the communications between the client and the server. A short video depicting IO Ninja recording the communications between the client application and the named pipe server can be seen below. This video demonstrates that it is possible for the client to write data to the named pipe server successfully as the TEST user.
Please keep the following points in mind whilst reviewing the video:
- The top command window is running as Administrator.
(*This is the Server.*) - The bottom command window is running as default user currently logged in.
(*This is the client.*) - The tool IO Ninja is present on the right hand of the screen monitoring data sent to the named pipe.
By reviewing the video, one can see that the data which was sent from the client to the server was recorded by IO Ninja's Pipe Monitor successfully. Because data sent from the client to the server was successful and the server did not reject the client’s request to WRITE data, one can verify that the output from accesschk.exe was correct: lower privileged users such as TEST can indeed write data to the named pipe, which is running at a higher privilege level. This can lead to privilege escalation depending on the type of functionality exposed by the named pipe server.
Final Thoughts on Handling the Access Control’s Around Named Pipe Servers
Improper permission assignment on critical resources is a common finding during VerSprite’s engagements. The impact of improper permissions assignment can range from information leakage to code execution.
To counter this, when handling the access control’s around named pipe servers, it is essential to apply proper controls. By applying proper access controls, and proper checks on potentially malicious data, the vulnerabilities in this intentionally vulnerable named pipe server would not be exploitable.
In this part II of this three-part series, we covered a detailed a hands-on approach to performing both static and dynamic analysis for discovering usage of named pipe servers within applications.
VS-Labs Research Team
Maintain awareness regarding unknown threats to your products, technologies, and enterprise networks. Organizations that are willing to take the next step in proactively securing their flagship product or environment can leverage our zero-day vulnerability research offering. Our subscription-based capability provides your organization with immediate access to zero-day vulnerabilities affecting products and software. Learn More →