The DevOps Approach to Automating C2 Infrastructure (Part Two)

Date
Authors
Ramiro Molina
Follow Us
Author: Ramiro Molina, Senior OffSec Security Consultant
In Part Two of our blog will show our readers how to build a fully automated C2 infrastructure using Terraform.
Deployment with Terraform
At this point in our build, we started to run some Terraform commands. From within the project folder, we execute the “terraform init” command to initialize the environment. This downloads the required providers we configured on Part One of this blog.
╰─$ terraform init

Initializing the backend...

Initializing provider plugins...
- Finding hashicorp/aws versions matching "4.54.0"...
- Installing hashicorp/aws v4.54.0...
- Installed hashicorp/aws v4.54.0 (signed by HashiCorp)

Terraform has created a lock file .terraform.lock.hcl to record the provider
selections it made above. Include this file in your version control repository
so that Terraform can guarantee to make the same selections by default when
you run "terraform init" in the future.

Terraform has been successfully initialized!

You may now begin working with Terraform. Try running "terraform plan" to see
any changes that are required for your infrastructure. All Terraform commands
should now work.

If you ever set or change modules or backend configuration for Terraform,
rerun this command to reinitialize your working directory. If you forget, other
commands will detect it and remind you to do so if necessary.
We tested the validity of the files by executing Terraform’s “validate” command. This command catches several syntax and typo errors while creating or editing the TF files.
Validate Configuration Files (optional)
We tested the validity of the files by executing Terraform’s “validate” command. This command catches several syntax and typo errors while creating or editing the TF files.
╰─$ terraform validateHandling WorkSpaces (optional)
Terraform can keep a separate state file for each workspace. This means different instances of this same infrastructure could be created and destroyed separately. A new workspace is created with the following command:
╰─$ terraform workspace new ╰─$ terraform workspace new test
Created and switched to workspace "test"!
You’re now in a new, empty workspace. Workspaces isolate their state,
so if you run "terraform plan" Terraform will not see any existing state
for this configuration.
1. List existing and current workspaces.
╰─$ terraform workspace list2. Change the current workspace.
╰─$ terraform workspace select <name>3. Delete a workspace.
╰─$ terraform workspace delete <name>Once we made the new workspace, we ran the Terraform “apply” command to create a unique, separate instance of the complete infrastructure we defined.
Terraform Plan (optional)
We checked the Terraform plan with the “plan” command (dry-run).
╰─$ terraform planTerraform Apply
Now, we executed the planned actions creating the resources. If changes are made to the configuration, it applies to the existing resources. We use (–auto-approve) to skip inputting “yes” to confirm the changes. Note that several errors in this phase cannot be captured during the configuration validation.
╰─$ terraform apply --auto-approve

Terraform used the selected providers to generate the following execution plan. Resource actions are indicated with the following symbols:
  + create

Terraform will perform the following actions:

  # aws_instance.https_redirector will be created
  + resource "aws_instance" "https_redirector" {
      + ami                                  = "ami-0557a15b87f6559cf"
As a result of this command, once deployment is completed successfully, we receive the details we need to connect to these instances as configured in the “output.tf” file.
Outputs:

HTTPS_Redirectors_Information = <<EOT
Redirector Public IP: 4.5.6.7
Redirector SSH: ssh [email protected]
Redirector FQDN: yourdomain.com
EOT
Team_Server_Information = <<EOT
Covenant Team Server Public IP: 3.4.5.6
Covenant Team Server SSH (Allowed Range 1.2.3.4/32): ssh [email protected]
Covenant Team Server Port Forwarding: ssh -L 7443:localhost:7443 [email protected] -N
EOT
Terraform Destroy
Once we finish using this infrastructure, we can simply execute a “destroy” command, and Terraform will proceed to delete/terminate all the resources it created in the first place. Remember to back up before you do this! ????
╰─$ terraform destroy --auto-approveTesting our deployment
We can follow the documented steps to configure Covenant when deployment is completed. To access Covenant’s management interface, we need to perform a port forward to be able to reach that service with the following command:
ssh -L 7443:localhost:7443 [email protected] -NThen, by accessing the interface through the URL https://localhost:7443, we create an administrator user account and password. After this, we are ready to create a new HTTP Listener, as shown below.
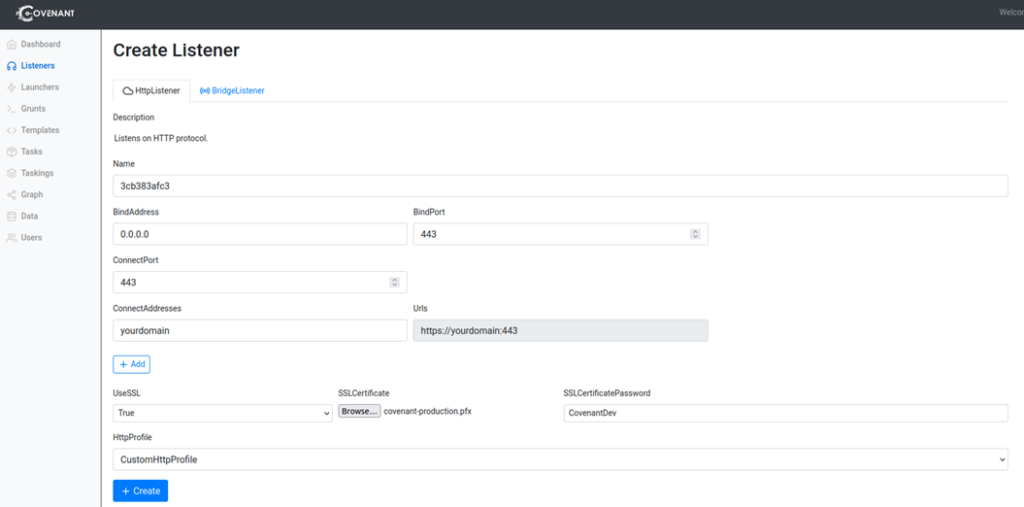
For this test, we use the “CustomHTTPProfile” available by default without any modification since our User-Agent filter in the HTTPS Redirector already expects that same value. We will need to provide the domain name we used in the Terraform configuration and any self-signed certificate we create to enable SSL.
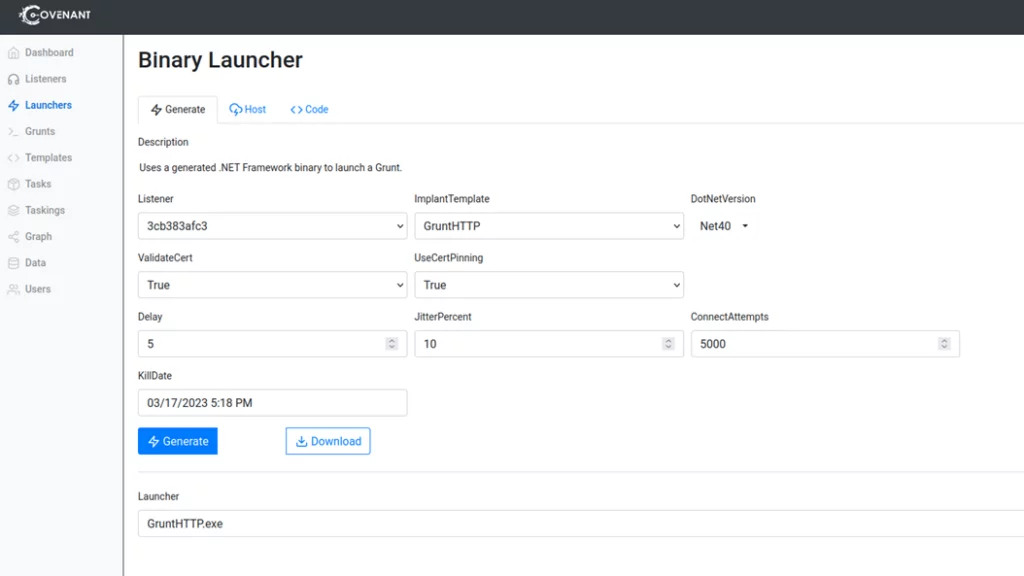
Once the Listener is created, we can create a new Launcher. We will use a Binary Launcher in our example, as shown below. From here, we can download a binary that we can copy to a Windows machine.
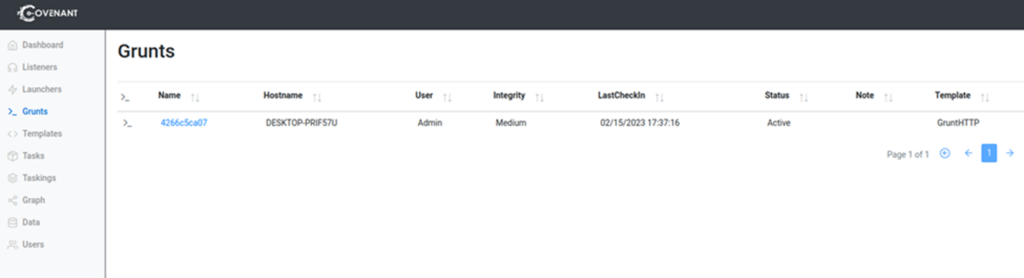
After disabling the AV in your Windows machine, we can execute the binary stager for the Grunt. Note that it is shown in the Grunts section of the Covenant console.
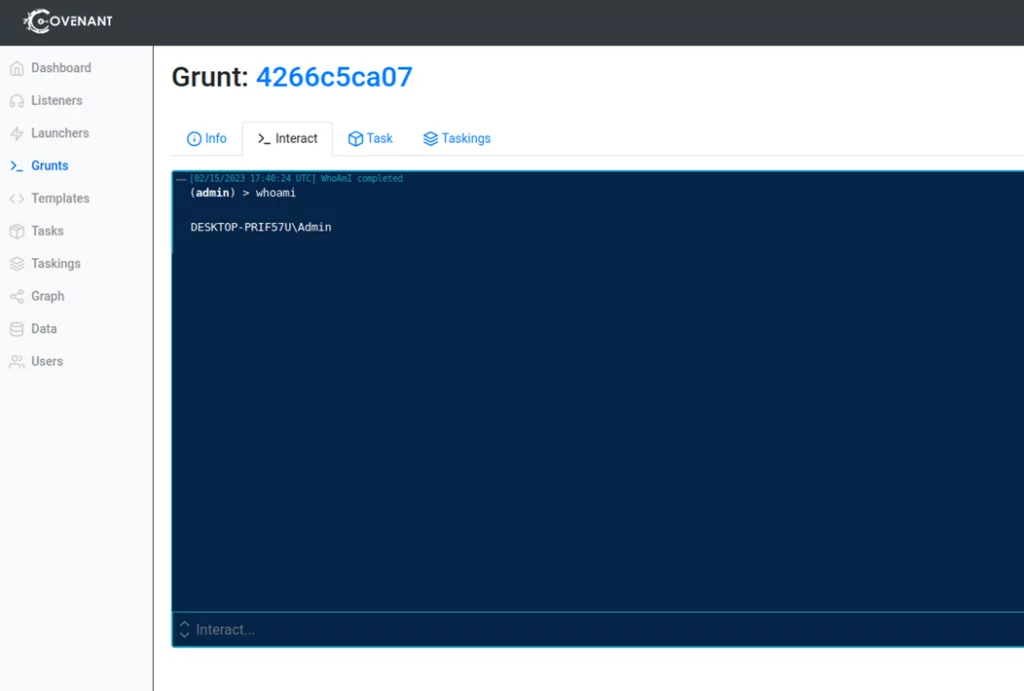
Clicking on the Grunt, we can interact with it to run many different Tasks already included with Covenant. For example, we see below that the “whoami” command was executed successfully.
If we want to test this setup further, we can access the redirectors’ logs to view the requests going through NGINX. Also, we can issue other requests to test the current basic filtering rules we implemented. In the following request, we use the same User-Agent header expected by Covenant and one of the paths by default included in the “CustomHTTPProfile. As we see, the response is the expected one.
╰─$ curl https://yourdomain.com/en-us/test.html -H "User-Agent: Mozilla/5.0 (Windows NT 6.1) AppleWebKit/537.36 (KHTML, like Gecko) Chrome/41.0.2228.0 Safari/537.36" -k
<html>
    <head>;
        <title>Hello World!</title>
    </headp>
    <body>
        <p>Hello World!</p>
        // Hello, World!
    </body>
</html>⏎
If we slightly change the user agent string, we obtain a default 404 error message as expected.
╰─$ curl https://yourdomain.com/en-us/test.html -H "User-Agent: Mozilla/15.0 (Windows NT 6.1) AppleWebKit/537.36 (KHTML, like Gecko) Chrome/41.0.2228.0 Safari/537.36" -k
<html>
<head><title>404 Not Found</title></head>
<body>
<center><h1>404 Not Found</h1></center>
If we add more complexity to the NGINX rules, we can test them further by issuing these requests.
Next Steps
Everything is working fine in our test environment, but we have more to do to minimize the chances of being detected or blocked by firewalls.
- Configure valid certificates in the HTTPS Redirector for the corresponding domains.
- Categorize the domains we use for operations.
- Modify the default Covenant listener profiles and use a custom one.
- Add more filtering techniques for our Redirector.
- Implement obfuscation and AV/EDR bypass techniques to the Grunt Stager and Executor code.
- Implement some form of Domain Fronting that still works.
- Use a hybrid deployment to allow operators in-house C2 and cloud redirectors.
C2 Infrastructure is an essential element in any red team operation. It allows your OffSec team to communicate, control, and manage offensive activities by facilitating recurring tasks and allowing them to adapt quickly with creative solutions during an engagement. It provides the team with the tools they need to modify tactics, techniques, and procedures (TTPs) in real-time, which boosts the efficiency of the exercise.
Want to know more about how red teaming can enhance your company’s security? Contact us today.
Share
- /
- /
- /
- /
- /
- /
- /
- /
- /
- /
- /
- /
- /
- /
- /
- /
- /
- /
- /
- /
- /
- /