The Free, Open-Source Pen Testing Tool: AlpnPASS by VerSprite

Date
Authors
Mario Vilas
Follow Us
Let’s cut to the chase. You want to know how our custom-developed security tool for pen testing (penetration testing) works, and we want you to be amazed by our team’s ability to develop the said tool.
We’ll get into some technical jargon to make you feel smart. Plus, we’ll take you through the steps of why we needed to create a custom tool to intercept TLS traffic, how we developed it, and exactly how to use it so you can save yourself the headache of manually peering into network traffic when testing custom applications.
The Building Blocks of AlpnPASS for Pen Testing
Our custom pen testing security tool, AlpnPASS is a tool developed by our Offensive Security team. This tool allows us to analyze network traffic more easily between an application we are testing and the server. (Think of it as the extra shot of espresso in our penetration tests.) This is an open-sourced free tool that we’re gifting to our readers, so stick around for a treat!
Let’s start with the basics. The Application-Layer Protocol Negotiation (ALPN) is a feature of TLS that allows applications to notify the server with the application level protocol they intend to use under the TLS layer. This is most frequently used with HTTP/2, but it may be used by any TLS service that wants to multiplex two or more mutually incompatible protocols on the same port number. It’s implemented as a protocol extension of TLS called Next Protocol Negotiation (NPN). ALPN helps the application inform the server of what protocol it wants to use to communicate.
The Specifics of AlpnPASS for Pen Testing
The image below is what it looks like when sniffing the traffic with Wireshark.
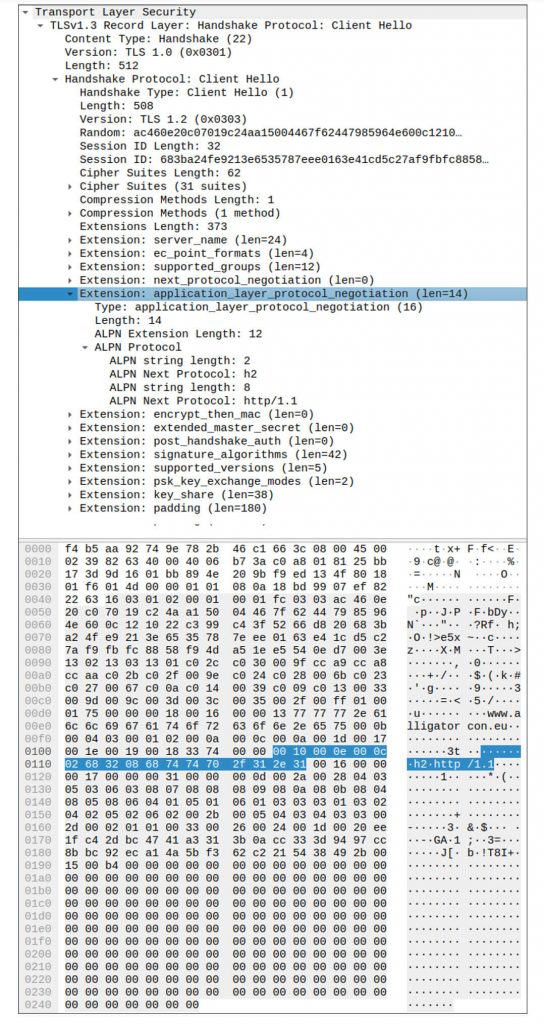
Figure 1 – ALPN negotiation captured by Wireshark
From the developer’s point of view, ALPN is a blessing. It allows for easy and elegant multiplexing without the hassle of having to peek at the first bytes of TCP connections and trying to guess the protocol by parsing it with multiple parsers to see which one picks it up.
Additionally, since the NPN packets are sent in plaintext, it’s easy for network monitoring solutions to figure out which protocols are being used without giving them access to the actual application data which is encrypted. It may be all fun and games for developers, but it was making our lives as pen testers more difficult.
For HTTP/2, we already used Burp Suite Pro to support it. However, we wanted to intercept TLS traffic in a binary protocol as we did on a recent assessment for a product that was developed in Go. Our initial attempt was to simply set up a couple of tunnels with stunnel to strip the TLS layer and redirect the traffic through IO Ninja’s TCP Proxy plugin like in the image below.
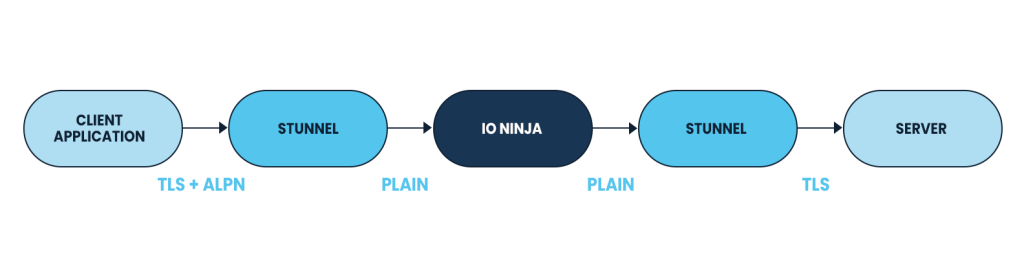
Unfortunately, this did not work because the ALPN negotiation was lost after removing TLS in the first step. Along with that, the second tunnel was unable to produce a TLS connection that was equivalent to the client software we were trying to analyze.
Testing HTTP/2 for ALPN and HTTP/2 Traffic Analyzed
So, if we try to use this setup to connect to an HTTP/2 server, our connection would revert back to HTTP/1.1.
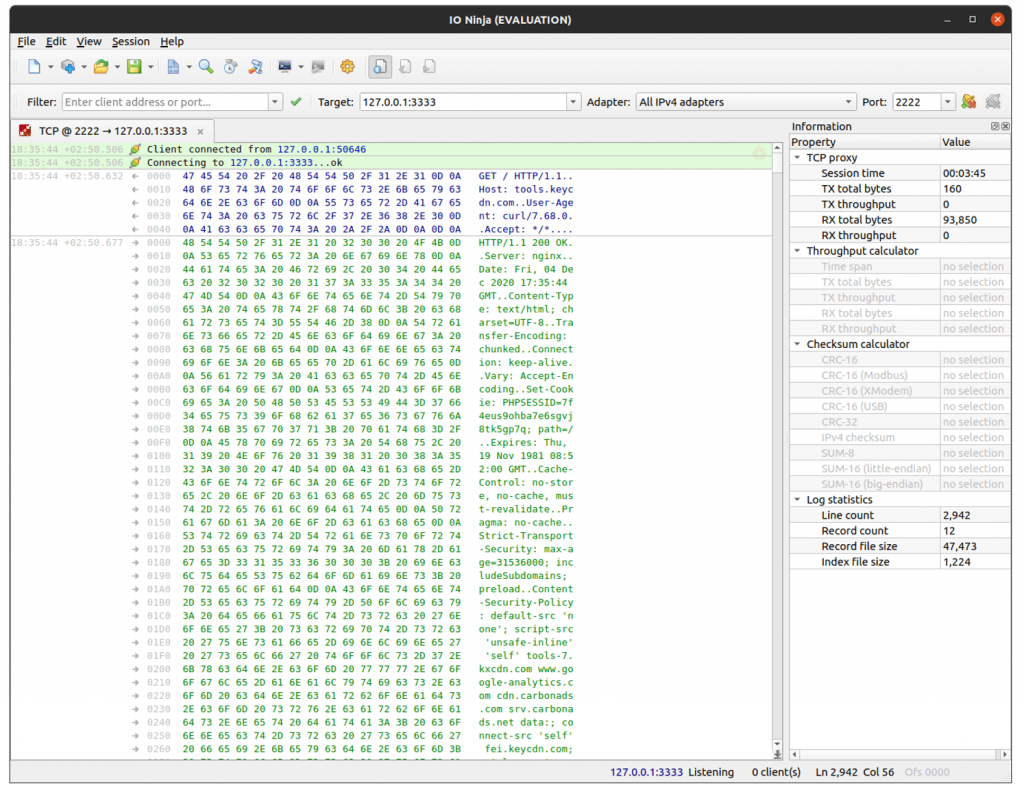
Figure 2 – Our test HTTP/2 reverted back to HTTP/1.1
At this point, we thought we could still work with it, but it got worse. While analyzing the application, we noticed that the server would reject the connection entirely because the correct ALPN extension packets were missing.
We were stumped. And we don’t get stumped very often because we are incredibly smart, talented, amazing, do-no-wrong kind of people, obviously. After scratching our heads for a while, we decided to develop a simple custom tool for this common scenario that we expect to be useful for future tests.
Introducing The Greatest Tool To Intercept TLS Traffic Using Alpn Ever…AlpnPASS For Pen Testing
The AlpnPASS tool will listen on a given port, strip SSL encryption, forward traffic through a plain TCP proxy, then encrypt the returning traffic again and send it to the target of your choice. Unlike most SSL stripping solutions, this tool will negotiate ALPN and preserve the negotiated protocol all the way to the target.
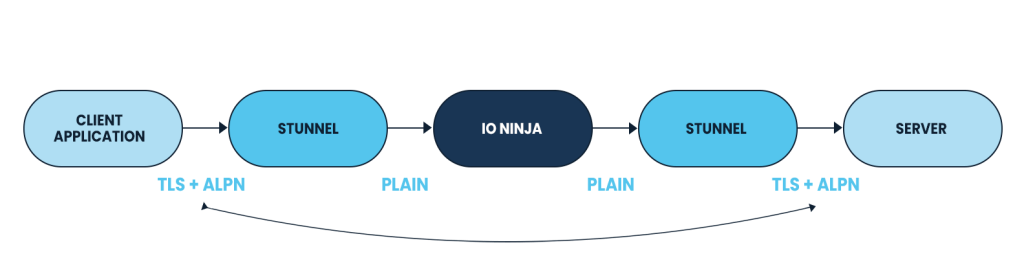
To accomplish this, a single instance of AlpnPASS listens on both ports. That way when the connection from the intercepting proxy comes back, the tool already knows which application layer protocol to negotiate with the server.
Using our tool prevents the connection from being reverted to HTTP/1.1 when trying to intercept HTTP/2. (Again, you’re welcome.)
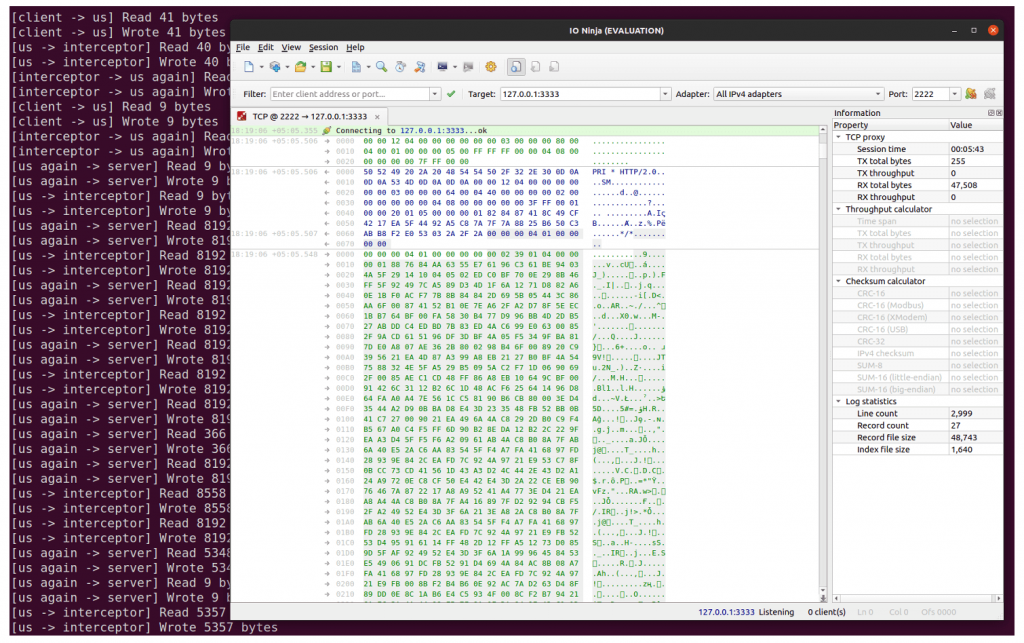
Figure 3 – HTTP/2 traffic now successfully captured by IO Ninja
If you read all of that and are still confused, no problem – we’re here to help you understand without (much) judgement. AlpnPASS gives pen testers insight into what is happening within the network traffic by how it sits between the server and the application you are testing.
In this scenario, we used IO Ninja, but it’s not necessary – you can use any tool for intercepting proxy.
How to Use AlpnPASS
Download the tool for free here: https://github.com/VerSprite/alpnpass. Compiling is straightforward because it was written in Go and has no dependencies – running the “go build” command is enough. Go version 1.14 or greater is required. There is only one optional argument, the name of the configuration file, which defaults to “alpnpass.json”.
./alpnpass [alpnpass.json]
Here’s an example configuration file with all default values:
{
	"InputPort":            "1111",
	"InterceptorPort":      "2222",
	"ReturnPort":           "3333",
	"OutputPort":           "4444",
	"InputBindIP":          "127.0.0.1",
	"InterceptorConnectIP": "127.0.0.1",
	"ReturnBindIP":         "127.0.0.1",
	"OutputConnectIP":      "127.0.0.1",
	"MinVersion":           "SSL30",
	"MaxVersion":           "TLS13",
	"Hostname":             "127.0.0.1",
	"CACert":               "ca.crt",
	"ServerCert":           "server.crt",
	"ServerKey":            "server.key",
	"ClientCert":           "client.crt",
	"ClientKey":            "client.key",
	"ALPN":                 [
		"h2",
		"h2c",
		"http/1.1",
		"http/1.0",
		"spdy/3",
		"spdy/2",
		"spdy/1",
		"stun.turn",
		"stun.nat-discovery",
		"webrtc",
		"c-webrtc",
		"ftp",
		"imap",
		"pop3",
		"managesieve",
		"coap",
		"xmpp-client",
		"xmpp-server",
		"acme-tls/1",
		"mqtt",
		"dot",
		"ntske/1",
		"sunrpc",
		"spdy/3.1",
		"h2-14",
		"h2-15",
		"h2-16"
	],
	"Ciphers": [
		"TLS_RSA_WITH_RC4_128_SHA",
		"TLS_RSA_WITH_AES_128_CBC_SHA256",
		"TLS_ECDHE_ECDSA_WITH_RC4_128_SHA",
		"TLS_ECDHE_RSA_WITH_RC4_128_SHA",
		"TLS_ECDHE_ECDSA_WITH_AES_128_CBC_SHA256",
		"TLS_ECDHE_RSA_WITH_AES_128_CBC_SHA256",
		"TLS_RSA_WITH_3DES_EDE_CBC_SHA",
		"TLS_RSA_WITH_AES_128_CBC_SHA",
		"TLS_RSA_WITH_AES_256_CBC_SHA",
		"TLS_RSA_WITH_AES_128_GCM_SHA256",
		"TLS_RSA_WITH_AES_256_GCM_SHA384",
		"TLS_AES_128_GCM_SHA256",
		"TLS_AES_256_GCM_SHA384",
		"TLS_CHACHA20_POLY1305_SHA256",
		"TLS_ECDHE_ECDSA_WITH_AES_128_CBC_SHA",
		"TLS_ECDHE_ECDSA_WITH_AES_256_CBC_SHA",
		"TLS_ECDHE_RSA_WITH_3DES_EDE_CBC_SHA",
		"TLS_ECDHE_RSA_WITH_AES_128_CBC_SHA",
		"TLS_ECDHE_RSA_WITH_AES_256_CBC_SHA",
		"TLS_ECDHE_ECDSA_WITH_AES_128_GCM_SHA256",
		"TLS_ECDHE_ECDSA_WITH_AES_256_GCM_SHA384",
		"TLS_ECDHE_RSA_WITH_AES_128_GCM_SHA256",
		"TLS_ECDHE_RSA_WITH_AES_256_GCM_SHA384",
		"TLS_ECDHE_RSA_WITH_CHACHA20_POLY1305_SHA256",
		"TLS_ECDHE_ECDSA_WITH_CHACHA20_POLY1305_SHA256"
	]
}
If the configuration file cannot be read or some settings are missing, the above default values will be used. Note that the default list of ciphers may differ from the one you see above because it depends on the exact version of Go used to compile the tool.
As shown, it is possible to configure the following list of items:
- the IP and port to bind each of the two listeners.
- the IP and port where the TCP proxy will be.
- all the required TLS certificates.
- the list of TLS versions, ciphers and ALPN protocol names that will be supported.
What we just mentioned is useful for testing if the client application you are examining behaves correctly, downgrading the TLS version or forcing the use of insecure ciphersuites. (For testing the same on the server, we used testssl.sh which does this, and more). Also note that the supported ALPN protocols can be modified, either to force the client to use one or to add new ones that may not be standard, as was our case.
With the default configuration, AlpnPASS will open TCP port 1111, receive TLS connections, and negotiate ALPN. Then it will connect to any intercepting TCP proxy of your choice in plaintext on port 2222 and expect return connections on port 3333. When receiving the return connection, traffic will be TLS encrypted again and sent to port 4444, using the same ALPN negotiated protocol.
Limitations of AlpnPASS: The Free Tool for Pen Testing
We can’t all be perfect, so our tool has some limitations. The TLS certificates are currently not autogenerated because AlpnPASS is meant to intercept more than just HTTP/2 and there is no generic way of determining the target hostname for any unknown binary protocol.
Along with that, only one connection at a time is supported on one given proxy chain. This will likely not be an issue because multiple simultaneous connections are hard to handle if you are inspecting traffic manually. To handle multiple connections, you can run two or more instances on different TCP ports each.
The Security Tool is Cool, But VerSprite is About More Than Tools
If you made it this far, you are either really interested in our tool, or you like our sharp wit and humor. Regardless, we hope this tool proves useful for your niche security testing needs. It was born out of a need to find a way to make our lives easier, and we hope by publicly releasing it allows it to help you too.
Creating a tool, like AlpnPASS, is not unusual for our Offensive Security team. We spend most of our days finding creative solutions to discover ways to break into our clients’ application. We specialize in creating test scenarios that emulate attack patterns and threat motives our clients might face – and we share that with you openly (mostly because the marketing team says we must…).
If you want to learn more about the behind-the-scenes of our red teaming engagements or how to have more effective pen tests for your clients, follow us here: Emulate Attack Scenarios for Any Application through Penetration Testing.
Put Your Physical and Cyber Security To The Test
VerSprite’s Offensive Security team focuses on emulating cybercrime and simulating test scenarios that not only reflect current attack patterns, but also threat motives. Our team can perform risk-based penetration testing, vulnerability assessments, red teaming exercises, and custom organizational threat models to expose your security gaps before your attackers do. Learn More About Offensive Secuirty Services→
Share
- /
- /
- /
- /
- /
- /
- /
- /
- /
- /
- /
- /
- /
- /
- /
- /
- /
- /
- /
- /
- /
- /